In the ever-evolving world of Android, custom ROMs stand out as a testament to the community’s ingenuity and passion for personalization. These alternative operating system distributions have a rich history, evolving from humble beginnings to becoming a cornerstone of Android enthusiast culture. Let’s embark on a journey through the past, present, and thriving community surrounding Android custom ROMs.
Custom ROMs emerged in the early days of Android as a response to the limitations imposed by manufacturers and carriers. Android’s open-source nature allowed developers to tinker with the code, leading to the creation of custom firmware tailored to specific devices. In the early 2010s, ROMs like CyanogenMod gained popularity for offering enhanced performance, additional features, and the latest Android updates to devices that were often left behind by manufacturers.
As the community grew, so did the diversity of ROMs. Projects like Paranoid Android, MIUI, and LineageOS (the successor to CyanogenMod) emerged, each with its unique features and design philosophies. Custom ROM development became a playground for innovation, with developers experimenting with everything from performance tweaks to entirely new user interfaces.
Today, the custom ROM scene remains vibrant, catering to a diverse range of users seeking to push the boundaries of their Android devices. While mainstream manufacturers continue to dominate the market, custom ROMs offer an alternative for users who crave more control over their user experience.
One of the driving forces behind the popularity of custom ROMs is their ability to breathe new life into older devices. Devices that have reached the end of their official support lifecycle can often continue to receive updates and feature enhancements through custom ROMs, extending their usability for years beyond what manufacturers intended.
At the heart of the custom ROM culture lies a passionate and tightly-knit community of developers, testers, and enthusiasts. Online forums, such as XDA Developers, serve as hubs for collaboration and knowledge sharing, where developers exchange ideas, troubleshoot issues, and distribute their creations to eager users.
The collaborative nature of the community fosters innovation and ensures that even niche devices receive attention from developers. It’s not uncommon to find custom ROMs available for obscure devices that mainstream manufacturers have long forgotten.
While the custom ROM scene encompasses a vast array of devices and projects, certain devices and ROMs have garnered particular attention and acclaim from enthusiasts.
Some of the top devices for custom ROM enthusiasts include Google’s Pixel lineup, OnePlus devices, and various offerings from Xiaomi, Samsung, and Asus. These devices often boast strong developer support, making them ideal candidates for those looking to dive into the world of custom ROMs.
As for custom ROMs themselves, LineageOS remains one of the most popular and widely supported projects, offering a clean and near-stock Android experience across a broad range of devices. Other notable ROMs include Paranoid Android for its innovative features, Resurrection Remix for its customization options, and Pixel Experience for its focus on delivering the Pixel’s software experience to non-Google devices.
The culture of Android custom ROMs is a testament to the power of community-driven innovation. What began as a grassroots movement to liberate Android devices from the constraints of manufacturers has evolved into a thriving ecosystem of creativity and exploration. As long as there are passionate developers and users seeking to push the boundaries of what’s possible with their Android devices, the custom ROM culture will continue to thrive, driving innovation and personalization in the Android ecosystem.
In the realm of enterprise computing, the choice of operating system (OS) is a critical decision that can impact everything from performance to security and scalability. For years, Linux distributions have been a staple in enterprise environments due to their stability, flexibility, and cost-effectiveness. Among these distributions, Ubuntu has emerged as a popular option, known for its ease of use and strong community support. But can Ubuntu truly replace any enterprise Linux distribution? Let’s explore the pros and cons.
Pros of Using Ubuntu in Enterprise Environments:
Ease of Use: Ubuntu is renowned for its user-friendly interface and straightforward installation process. This can reduce the learning curve for administrators and make deployment smoother.
Package Availability: Ubuntu boasts a vast repository of software packages, covering a wide range of applications and tools. This ensures that enterprises have access to the software they need to meet their business requirements.
Community Support: Ubuntu has a large and active community of users and developers who provide support through forums, documentation, and tutorials. This can be invaluable for troubleshooting issues and staying updated on best practices.
Regular Updates: Ubuntu follows a predictable release cycle with LTS (Long Term Support) versions released every two years. These LTS releases are supported for five years, providing enterprises with stability and security updates over an extended period.
Cost-Effectiveness: Ubuntu is open-source and free to use, making it a cost-effective option for enterprises looking to minimize licensing fees without compromising on quality.
Cons of Using Ubuntu in Enterprise Environments:
Commercial Support: While Ubuntu offers community support, enterprises may require additional support options, especially for mission-critical systems. Canonical, the company behind Ubuntu, provides commercial support, but this may come at an added cost.
Enterprise Applications Compatibility: Some enterprise applications are certified to run only on specific Linux distributions, such as Red Hat Enterprise Linux (RHEL) or SUSE Linux Enterprise Server (SLES). Compatibility issues may arise when attempting to run these applications on Ubuntu.
Security Concerns: While Ubuntu is generally considered secure, some enterprises may have specific security requirements or compliance standards that mandate the use of a particular Linux distribution with enhanced security features.
Customization and Configuration: Enterprises with highly specialized requirements or existing infrastructure built around another Linux distribution may find it challenging to migrate to Ubuntu due to differences in configuration and customization options.
Case Study: The City of Munich’s Migration to Ubuntu
One notable example of Ubuntu’s adoption in the enterprise is the City of Munich’s migration from Windows to Ubuntu Linux. In 2004, the city embarked on a project to replace proprietary software with open-source alternatives, citing cost savings and increased flexibility as primary motivations. After a decade-long migration process, thousands of desktops were successfully transitioned to Ubuntu Linux, resulting in significant cost reductions and greater control over IT infrastructure.
Conclusion:
While Ubuntu offers many advantages for enterprise environments, it may not be suitable for every organization’s needs. Factors such as compatibility requirements, support options, and security considerations should be carefully evaluated before making a decision. However, as demonstrated by case studies like the City of Munich’s migration, Ubuntu has proven to be a viable option for enterprises seeking to leverage the benefits of open-source software in their IT infrastructure.
In conclusion, while Ubuntu may not replace every enterprise Linux distribution, its strengths in terms of ease of use, package availability, and community support make it a compelling choice for many organizations. As with any technology decision, careful planning and consideration of specific requirements are essential to ensure a successful implementation.
APT 2.9.3 introduces the first iteration of the new solver codenamed
solver3, and now available with the –solver 3.0 option. The new solver
works fundamentally different from the old one.
How does it work?
Solver3 is a fully backtracking dependency solving algorithm that defers
choices to as late as possible. It starts with an empty set of packages,
then adds the manually installed packages, and then installs packages
automatically as necessary to satisfy the dependencies.
Deferring the choices is implemented multiple ways:
First, all install requests
recursively mark dependencies with a single solution for install, and any
packages that are being rejected due to conflicts or user requests will
cause their reverse dependencies to be transitively marked as rejected,
provided their or group cannot be solved by a different package.
Second, any dependency with more than one choice is pushed to a priority
queue that is ordered by the number of possible solutions, such that we
resolve a|b before a|b|c.
Not just by the number of solutions, though. One important point to
note is that optional dependencies, that is, Recommends, are always
sorting after mandatory dependencies. Do note on that: Recommended
packages do not “nest” in backtracking - dependencies of a Recommended
package themselves are not optional, so they will have to be resolved
before the next Recommended package is seen in the queue.
Another important step in deferring choices is extracting the common
dependencies of a package across its version and then installing them
before we even decide which of its versions we want to install - one
of the dependencies might cycle back to a specific version after all.
Decisions about package levels are recorded at a certain decision level,
if we reach a conflict we backtrack to the previous decision level,
mark the decision we made (install X) in the inverse (DO NOT INSTALL X),
reset all the state all decisions made at the higher level, and restore
any dependencies that are no longer resolved to the work queue.
Comparison to SAT solver design.
If you have studied SAT solver design, you’ll find that essentially
this is a DPLL solver without pure literal elimination. A pure literal
eliminitation phase would not work for a package manager: First negative
pure literals (packages that everything conflicts with) do not exist,
and positive pure literals (packages nothing conflicts with) we do not want
to mark for install - we want to install as little as possible (well subject,
to policy).
As part of the solving phase, we also construct an implication graph, albeit
a partial one: The first package installing another package is marked as the
reason (A -> B), the same thing for conflicts (not A -> not B).
Once we have added the ability to have multiple parents in the implication
graph, it stands to reason that we can also implement the much more advanced
method of conflict-driven clause learning; where we do not jump back to the
previous decision level but exactly to the decision level that caused the
conflict. This would massively speed up backtracking.
What changes can you expect in behavior?
The most striking difference to the classic APT solver is that solver3 always keeps
manually installed packages around, it never offers to remove them. We will relax that
in a future iteration so that it can replace packages with new ones, that is, if your
package is no longer available in the repository (obsolete), but there is one that
Conflicts+Replaces+Provides it, solver3 will be allowed to install that and remove the
other.
Implementing that policy is rather trivial: We just need to queue obsolete | replacement
as a dependency to solve, rather than mark the obsolete package for install.
Another critical difference is the change in the autoremove behavior: The new solver
currently only knows the strongest dependency chain to each package, and hence it will
not keep around any packages that are only reachable via weaker chains.
A common example is when gcc-<version> packages accumulate on your system over the
years. They all have Provides: c-compiler and the libtoolDepends: gcc | c-compiler
is enough to keep them around.
New features
The new option --no-strict-pinning instructs the solver to consider all versions of
a package and not just the candidate version. For example, you could use apt install foo=2.0 --no-strict-pinning
to install version 2.0 of foo and upgrade - or downgrade - packages as needed to satisfy foo=2.0 dependencies.
This mostly comes in handy in use cases involving Debian experimental or the Ubuntu proposed pockets, where you
want to install a package from there, but try to satisfy from the normal release as much as possible.
The implication graph building allows us to implement an apt why command, that while not as nicely
detailed as aptitude, at least tells you the exact reason why a package is installed. It will only show
the strongest dependency chain at first of course, since that is what we record.
What is left to do?
At the moment, error information is not stored across backtracking in any way, but we generally
will want to show you the first conflict we reach as it is the most natural one; or all conflicts.
Currently you get the last conflict which may not be particularly useful.
Likewise, errors currently are just rendered as implication graphs of the form [not] A -> [not] B -> ...,
and we need to put in some work to present those nicely.
The test suite is not passing yet, I haven’t really started working on it. A challenge is that most
packages in the test suite are manually installed as they are mocked, and the solver now doesn’t remove
those.
We plan to implement the replacement logic such that foo can be replaced by foo2 Conflicts/Replaces/Provides foo
without needing to be automatically installed.
Improving the backtracking to be non-chronological conflict-driven clause learning would vastly
enhance our backtracking performance. Not that it seems to be an issue right now in my limited
testing (mostly noble 64-bit-time_t upgrades). A lot of that complexity you have normally is not
there because the manually installed packages and resulting unit propagation (single-solution
Depends/Reverse-Depends for Conflicts) already ground us fairly far in what changes we can actually make.
Once all the stuff has landed, we need to start rolling it out and gather feedback. On Ubuntu I’d like
automated feedback on regressions (running solver3 in parallel, checking if result is worse and then
submitting an error to the error tracker), on Debian this could just be a role email address to send
solver dumps to.
At the same time, we can also incrementally start rolling this out. Like phased updates in Ubuntu,
we can also roll out the new solver as the default to 10%, 20%, 50% of users before going to the
full 100%. This will allow us to capture regressions early and fix them.
May 14, 2024 – Canonical, the publisher of Ubuntu, is delighted to announce the general availability of Ubuntu Pro for Amazon Elastic Kubernetes Service (Amazon EKS). This expansion brings robust security offerings to AWS’ managed Kubernetes service, including enhanced uptime and security through Kernel Livepatch and unrestricted access to Pro containers to Amazon EKS, a managed Kubernetes services to run Kubernetes on Amazon Web Services (AWS) and on-premises data centers.
Amazon EKS clusters running containers with additional security
Running an Ubuntu Pro cluster will give customers access to an unlimited registry of containers, with expanded security coverage for your apps and uninterrupted security patches to the kernel in underlying nodes.
“We are excited to announce Ubuntu Pro as a new option for Amazon Elastic Kubernetes Service (Amazon EKS) users,” said Barry Cooks, VP Kubernetes at Amazon Web Services (AWS). “At AWS, we strive to provide our customers with the broadest selection of tools and services to help them build, deploy, and run their applications. With Ubuntu Pro now available on Amazon EKS, customers can migrate their on-premises Ubuntu Pro estates to Amazon EKS with the same secure, compliant, and supported open-source operating system that they know and trust.”
“At Civis Analytics the stability and security provided by Ubuntu Pro is critical to our security posture,” said Sean Mann, Director of Infrastructure and Security at Civis Analytics. “The integration of Ubuntu Pro with Amazon EKS streamlines the deployment process, eliminating the need for manual configuration steps previously required for Ubuntu Pro implementation within Amazon EKS environments. This will streamline our image-building process and give DevOps engineers more time to focus on other critical efforts.”
Amazon EKS extended support coverage with Ubuntu Pro
The EKS extended support period provides an additional 12 months of support for Kubernetes minor versions. Ubuntu Pro for Amazon EKS extends the support to the cluster (worker nodes), aligning with the security coverage period for the complete Amazon EKS lifecycle.
Ubuntu Pro for EKS: how it works
Ubuntu Pro for Amazon EKS is an optimised Amazon Machine Image (AMI) based on the official Ubuntu Minimal LTS image. It includes the AWS optimised kernel, Amazon EKS binaries and an additional layer of Ubuntu Pro services such as kernel livepatch and Expanded Security Maintenance.
These images have been built specifically for the Amazon EKS service, and are therefore not intended as general OS images.
Running Amazon EKS with Ubuntu Pro clusters will also entitle customers to run containers with Expanded Security Maintenance, covering all the third-party open source software. Ubuntu Pro also provides compliance tools, such as CIS hardening and FIPS for FedRAMP.
“Canonical and AWS have a longstanding relationship delivering a reliable, secure, and consistent experience across their ecosystems,” said Alex Gallagher, Vice President of Public Cloud at Canonical. “With Ubuntu Pro now available on EKS, customers can launch containers in Amazon EKS and take advantage of all security and compliance features for Ubuntu Pro including Livepatch and FIPS. This advancement highlights our ongoing commitment to facilitating open-source software, ensuring freedom and security.”
How to launch EKS clusters with Ubuntu Pro
Ubuntu Pro on EKS is available on EC2 and also the AWS Marketplace. Customers can deploy their Ubuntu Pro clusters using EC2 Launch Templates or eksctl.
Canonical, the publisher of Ubuntu, provides open source security, support and services. Our portfolio covers critical systems: from the smallest devices to the largest clouds, from the kernel to containers, from databases to AI. With customers ranging from top tech brands and emerging startups, to governments and home users, Canonical delivers trusted open source for everyone.
In this post we’ll explore deploying a fully operational, on-premise data hub using Canonical’s data centre and cloud automation solutions MAAS (Metal as a Service) and Juju.
MAAS is the industry standard open source solution for provisioning and managing physical servers in the data centre. With the rich featureset of MAAS, you can build a bare-metal cloud for any purpose. This time we’ll use MAAS to deploy a data hub for big data storage and distributed, parallel processing with Charmed Spark – Canonical’s solution for Apache Spark. Spark has become the de-facto solution for big data processing these days.
Juju is Canonical’s take on cloud orchestration. Juju orchestrates “Charms”, which are software operators that help you to handle deployment, configuration and operation of complex distributed infrastructure and platform software stacks. Juju works with both Virtual Machines and Kubernetes so that you can build up complex service architectures in a flexible manner. Juju Charms are available for many different purposes – from cloud building through to Kubernetes, distributed databases and beyond to AI/MLOps.
Sometimes the cloud just doesn’t cut it. For whatever reason you want to deploy your data hub on premise – this could be because of the scale of the service, or cost, the sensitivity of the data being processed, or simply a matter of company policy. MAAS makes it straightforward to manage data centre systems at scale, and with Juju we can orchestrate those systems and the software applications that they run in sophisticated ways.
We’ll first deploy MAAS and get it to PXE boot some physical servers. For the physical servers, I’ve used five Lenovo ThinkCenter computers that I bought refurbished from Amazon, although you could use any suitable x86_64 hardware that you have available. I found that ThinkCenters offer a relatively low cost approach to building a home lab. Although they vary in price, I picked them up for about $200 per system plus tax which gives me 16GB of RAM, 4 CPU cores and 250GB of storage per system – enough for a home lab and for this post.
I installed MAAS on my Ubuntu 22.04 LTS laptop, so my laptop acts as the controller for the home lab.
To get started, we’ll run the following commands to install MAAS. We’ll also install a specially preconfigured test PostgreSQL database for MAAS, to make home lab configuration a bit easier. For production, you’d want a dedicated external PostgreSQL database cluster.
When you’ve entered a suitable URL, or accepted the default, the following prompt will appear:
MAAS has been set up.

If you want to configure external authentication or use
MAAS with Canonical RBAC, please run

  sudo maas configauth

To create admins when not using external authentication, run

  sudo maas createadmin
Let’s go ahead and create that admin account so we can proceed. It’s important to import your SSH public keys from GitHub (gh) or LaunchPad (lp) as MAAS will need these to be able to grant you SSH access to the systems that it deploys. Note as well that MAAS configures the SSH user to be ubuntu.
There’s one final step: we’ll want an API key so that we can orchestrate MAAS actions with Juju. Let’s make one now for our MAAS user account that we just created.
sudo maas apikey --username yourusername
Enable TLS on MAAS
Let’s set up some wire encryption for our services, starting by generating a root CA certificate and server certificate for the MAAS API and Web UI.
Now we should be able to log into the MAAS web UI and start adding our host systems to the MAAS inventory. You’ll need to step past the security warning, as this is a self-signed certificate. Obviously for production use you should use a real CA (Certificate Authority) – whether a third party like Let’s Encrypt or a CA that your organisation manages.
Once you’ve logged in with the username and password you just created, you’ll need to perform some further configuration steps to get MAAS working like it should.
Under “Networking”, go to “Subnets”.
Find the network where you will be adding your servers. For example, my network is 192.168.86.0/24. Click on the VLAN link to the left of this network. The link is likely titled “untagged”.
Find and click the button “Configure DHCP”.
Leave the checkbox “MAAS provides DHCP” checked.
Choose “Provide DHCP from rack controller(s)”.
Click the dropdown list entitled “Select subnet…” and choose the available subnet
Choose sensible values for start IP address and end IP address, and set the gateway IP address to your network’s gateway IP address.
Click the button “Configure DHCP”.
While we’re here, let’s reserve a small range of IP addresses that MAAS won’t touch, that we can use for the MetalLB Kubernetes load balancer and also for the Ceph Rados Gateway which we’ll deploy later on.
Again under “Networking”, “Subnets”.
Find the network where you will be adding your servers. For example, my network is 192.168.86.0/24. Click on the VLAN link to the left of this network. The link is likely entitled “untagged”.
Find and click the button “Reserve Range”.
Click “Reserve Range” from the dropdown menu.
Take a small range of five IP addresses from within the subnet – I took a start IP of 192.168.86.90 and an end IP of 192.168.86.95
Click “Reserve”.
Repeat the process for the Ceph Rados Gateway, this time take just a single IP address for both start and end addresses – I took 192.168.86.180
Ok, so we’ve configured the minimal networking requirements to get MAAS working. Of course, you can go much, much further with MAAS in a data centre environment with sophisticated VLAN, zone, hall and site configurations. But this will be just enough for our home lab and to build our data hub.
Now that those steps are done, we can start enlisting machines. To enlist a machine, you’ll first need to perform the following preparatory steps.
On the target machine:
Enter the system BIOS of the machine. In the boot sequence menu, enable network (PXE) booting and make this the first item in the boot order. You might also need to enable PXE IPv4 stack in the networking menu, depending on your BIOS.
While you’re here, check that the CPU has virtualization extensions enabled and if not, enable them as we’ll need this later.
In the MAAS UI, under Hardware, go to Machines and choose “Add Hardware” from the menu in the top right of the screen. From the dropdown menu, choose “Machine”.
Give your system a name, for instance metal1.
Enter the MAC address of your system’s network adapter. You should be able to find this in the BIOS or otherwise your system may display it on the screen at boot time.
In the “Power Type” dropdown, choose “Manual”.
Click “Save Machine”.
Now go back to your target machine, exit the BIOS configuration screen and reboot.
At this point, the system should enter PXE boot mode and initiate a network boot from MAAS. The system should also show up in the MAAS machine inventory, in the state “Commissioning”. After a while, the machine will provision and shut itself down. To prevent the machine shutting down all the time and to gain SSH access, we’ll commission it again, by performing the following steps.
Check the checkbox next to the system in the “Machines” screen.
In the dropdown menu labelled “Actions”, choose “Commission…”.
Check the checkbox labelled “Allow SSH access and prevent machine powering off”.
Click the button “Start commissioning for this machine”.
You’ll need to power the machine on manually, and at this point it should start reprovisioning. Note that in a real data centre, power cycling the machine is usually done through remote management agents, which MAAS can fully support. Once completed, the machine should be marked “Available” in the “Machines” screen.
Next we’ll want to move the system to “deployed” state.
Again, check the checkbox next to the system in the “Machines” screen.
In the dropdown menu labelled “Actions”, choose “Deploy…”.
Check the checkbox labelled “Register as MAAS KVM host”.
You can choose either “LXD” or “libvirt” here – I chose libvirt for my systems.
You’ll need to power cycle the machine manually again, and at this point it should start installing Ubuntu Server on the system. Once completed, the machine should be marked “Deployed” in the “Machines” screen.
That’s all that we need to do to have the system deployed and operational for our purposes. Repeat the process for the other systems that you’ll be using to build the data hub.
Back to black (and green)
Now that we have some physical hosts to build our data hub on, our next step is going to be to deploy the foundational services, which we’ll do at the command line. The foundation platform services we’ll deploy are:
Juju controllers for orchestration,
a Ceph object storage cluster based on Charmed Ceph,
We’ll deploy those foundational platform services into VMs running on top of our physical host systems, using Juju. Juju will create, configure, and manage the VMs and the software which runs on them, which will be PXE boot provisioned over the network by MAAS.
Get your Juju on
First, let’s install and configure Juju so that it knows how to work with our MAAS environment. You’ll need the MAAS API token that we made earlier, as well as the URL of your MAAS server. The following commands will:
Install the Juju client on the local laptop.
Register the MAAS environment with Juju.
Install a three node cluster of Juju controllers on VMs on top of our MAAS environment to ensure Juju has high-availability.
We’ve got the first bits down. Note that in this post, we’ll build our data platform with VMs running on top of the physical systems we provisioned, using LXD. But if you wanted, you could also build the data platform directly on bare metal systems by adding an inventory of physical systems using syntax similar to juju add-machine ssh:ubuntu@hostname. You can learn more about this command in the Juju operations guide.
Anyway, let’s set the password on our administrator account for the Juju controllers before we go any further. Run the command and enter your preferred password. You’ll need to enter it twice to confirm.
juju change-user-password admin
Just so you know, you can always log in to Juju (for example from some other computer configured to manage the Juju controllers) using the following command.
juju login -u admin
Build up
Now that Juju is ready, we’ll build up the foundation components. First we’ll create a Juju “model” – which is like a namespace for resources. Then we’ll deploy a six node MicroK8s Kubernetes cluster into the model we created, and finally we’ll deploy a Ceph object storage cluster into the model. These commands will take a while to run to completion, so in the meantime go and make yourself a nice cup of tea. You can check on progress in a new terminal window by running juju status from time to time.
Lastly, we’ll deploy a Grafana agent component to enable us to monitor MicroK8s with COS (the Canonical Observability Stack), which we’ll deploy shortly.
The commands we just ran should be quite self-explanatory. Just a few details to note:
juju deploy <thing> -n 3 means deploy 3 instances of the thing.
When we deploy ceph-osd, we tell Juju to create one loopback storage device per node, with 1GB of capacity. This is good for testing but not suitable for a production data hub deployment. Ceph can handle many petabytes of storage, so obviously you can change this to reference physical block devices on the host. Learn more in the Charmed Ceph documentation.
Once the commands complete, you should have a working set of foundation services that will enable you to store and retrieve data through the AWS S3 object store API. You should also now have a platform to facilitate distributed, parallel processing of data, in the form of a Kubernetes cluster. Let’s proceed.
Deploy Vault
Now we’ll deploy Vault, to manage TLS on behalf of Ceph’s Rados Gateway API server.
We need to configure Ceph and grant ourselves access by creating a user account, and we need to create buckets for both our big data and for our Spark job logs. Let’s get to it.
We’ll use the Minio mc client to interact with Ceph.
sudo snap install minio-mc-nsg
sudo snap alias minio-mc-nsg mc

# Create a Ceph user account
CEPH_RESPONSE_JSON=$(juju ssh ceph-mon/leader 'sudo radosgw-admin user create \
   --uid="ubuntu" --display-name="Charmed Spark user"')

# Get the account credentials
CEPH_ACCESS_KEY_ID=$(echo ${CEPH_RESPONSE_JSON} | yq -r '.keys[].access_key')
CEPH_SECRET_ACCESS_KEY=$(echo ${CEPH_RESPONSE_JSON} | yq -r '.keys[].secret_key')

# Configure mc to work with Ceph
mc config host add ceph-radosgw https://${CEPH_VIP}  \
  ${CEPH_ACCESS_KEY_ID} ${CEPH_SECRET_ACCESS_KEY}

mc mb ceph-radosgw/spark-history
mc mb ceph-radosgw/data
Let’s add bucket policies to the two object storage buckets we just made, to grant access to just our ubuntu user.
We can use Juju to deploy and manage our entire platform, including the bits that run on Kubernetes. The first step is to make Juju aware of our Kubernetes environment.
Next we’ll create a Kubernetes namespace where our Spark jobs will run, and also deploy the Spark History Server into it. Spark History Server is Spark users’ go-to web app for troubleshooting Spark jobs. These commands will configure the Spark History Server to read Spark job logs from the bucket spark-history in Ceph, under the key prefix spark-events.
Note that when we deploy Spark History Server, we choose to set constraints to enable more granular control over how much cluster resources are grabbed by the service. In this case we limit memory to 1GB of RAM and cpu-power to 100 millicores, which is about 1/10th of a CPU core.
juju add-model spark-model microk8s-cloud

# Deploy the Spark History Server and supporting cast
juju deploy spark-history-server-k8s --constraints="mem=1G cpu-power=100"
juju deploy s3-integrator --channel=latest/edge
juju deploy traefik-k8s --trust
juju-wait

# Connect History Server to S3 bucket
juju config s3-integrator bucket="spark-history" path="spark-events" \
  endpoint=https://${CEPH_VIP} tls-ca-chain="$(cat ceph-ca.pem | base64)"

juju run s3-integrator/leader sync-s3-credentials access-key=${CEPH_ACCESS_KEY_ID} secret-key=${CEPH_SECRET_ACCESS_KEY}

juju integrate s3-integrator spark-history-server-k8s
juju integrate spark-history-server-k8s traefik-k8s
Observability stack
Nice. Now we’ll set up the Canonical Observability Stack, which is an integrated observability solution built on Grafana, Loki and Prometheus for metrics, logs and alerting.
The last three commands above enable applications Juju manages in other “models”, regardless whether deployed on Kubernetes or directly on VMs, to integrate with the observability components.
Let’s deploy a Prometheus push gateway so that our Spark jobs can send metrics over to Prometheus, and we’ll install a preconfigured Spark dashboard in Grafana so that we can monitor our jobs. Then before we continue, we’ll just grab the IP of the Prometheus push gateway so that we can configure our Spark jobs to push metrics to it. Since Spark jobs may be ephemeral batch jobs, instead of getting Prometheus to regularly scrape metrics from a static endpoint, we’ll configure the Spark Jobs to push metrics to a central component (the push gateway). This way, even when jobs are short-lived and transient, metrics will be forwarded to Prometheus and available to the operations team via Grafana.
juju switch spark-model

juju deploy prometheus-pushgateway-k8s --channel=edge; juju-wait
juju deploy prometheus-scrape-config-k8s scrape-interval-config --config scrape_interval=5; juj-wait

# Connect to COS via cross model relations
juju consume admin/cos-model.prometheus-scrape prometheus
juju integrate prometheus-pushgateway-k8s prometheus
juju integrate scrape-interval-config prometheus-pushgateway-k8s
juju integrate scrape-interval-config:metrics-endpoint prometheus:metrics-endpoint

# Grab the pushgateway IP
PROMETHEUS_GATEWAY_IP=$(juju status --format=yaml | yq ".applications.prometheus-pushgateway-k8s.address")
Now let’s go back to the Juju model that contains our foundation infrastructure and integrate MicroK8s and Ceph with our observability stack:
Alright. Next step is to configure Spark to run on our data hub platform – it’s rapidly taking shape. First let’s install the spark-client snap, and then create a properties file for our logging and metrics configuration.
After that, we’ll store this configuration centrally using the spark-client.service-account-registry tool. This way the service account we will use to interact with the Kubernetes cluster can automatically apply the configuration from any edge node or even from a pod on the cluster.
To keep things light and ensure things get scheduled on our six-node Kubernetes cluster, I’ve also added configuration to drop the requested CPU shares to 0.01 of a CPU per Spark driver and executor; however when running at scale in a production context you’ll want to tweak this value and most likely set it much higher.
# Let's live life on the edge
sudo snap install spark-client --channel=3.4/edge

cat > spark.conf <<EOF
spark.eventLog.enabled=true
spark.hadoop.fs.s3a.aws.credentials.provider=org.apache.hadoop.fs.s3a.SimpleAWSCredentialsProvider
spark.hadoop.fs.s3a.connection.ssl.enabled=true
spark.hadoop.fs.s3a.path.style.access=true
spark.hadoop.fs.s3a.access.key=${CEPH_ACCESS_KEY_ID}
spark.hadoop.fs.s3a.secret.key=${CEPH_SECRET_ACCESS_KEY}
spark.hadoop.fs.s3a.endpoint=https://${CEPH_VIP}
spark.eventLog.dir=s3a://spark-history/spark-events/
spark.history.fs.logDirectory=s3a://spark-history/spark-events/
spark.driver.log.persistToDfs.enabled=true
spark.driver.log.dfsDir=s3a://spark-history/spark-events/
spark.metrics.conf.driver.sink.prometheus.pushgateway-address=${PROMETHEUS_GATEWAY_IP}:9091
spark.metrics.conf.driver.sink.prometheus.class=org.apache.spark.banzaicloud.metrics.sink.PrometheusSink
spark.metrics.conf.driver.sink.prometheus.enable-dropwizard-collector=true
spark.metrics.conf.driver.sink.prometheus.period=5
spark.metrics.conf.driver.sink.prometheus.metrics-name-capture-regex=([a-z0-9]*_[a-z0-9]*_[a-z0-9]*_)(.+)
spark.metrics.conf.driver.sink.prometheus.metrics-name-replacement=\$2
spark.metrics.conf.executor.sink.prometheus.pushgateway-address=${PROMETHEUS_GATEWAY_IP}:9091
spark.metrics.conf.executor.sink.prometheus.class=org.apache.spark.banzaicloud.metrics.sink.PrometheusSink
spark.metrics.conf.executor.sink.prometheus.enable-dropwizard-collector=true
spark.metrics.conf.executor.sink.prometheus.period=5
spark.metrics.conf.executor.sink.prometheus.metrics-name-capture-regex=([a-z0-9]*_[a-z0-9]*_[a-z0-9]*_)(.+)
spark.metrics.conf.executor.sink.prometheus.metrics-name-replacement=\$2
spark.kubernetes.executor.request.cores=0.01
spark.kubernetes.driver.request.cores=0.01
spark.kubernetes.container.image=ghcr.io/canonical/charmed-spark:3.4-22.04_edge
spark.executor.extraJavaOptions="-Djavax.net.ssl.trustStore=/spark-truststore/spark.truststore -Djavax.net.ssl.trustStorePassword=changeit"
spark.driver.extraJavaOptions="-Djavax.net.ssl.trustStore=/spark-truststore/spark.truststore -Djavax.net.ssl.trustStorePassword=changeit"
spark.kubernetes.executor.secrets.spark-truststore=/spark-truststore
spark.kubernetes.driver.secrets.spark-truststore=/spark-truststore
EOF

# Create a Java keystore containing the CA certificate for Ceph
# and make it available to Spark jobs in K8s
echo ${KUBECONF} > kubeconfig
cp /usr/lib/jvm/java-11-openjdk-amd64/lib/security/cacerts .
keytool -import -alias ceph-cert -file ceph-ca.pem -storetype JKS -keystore cacerts -storepass changeit -noprompt
mv cacerts spark.truststore
kubectl --kubeconfig=./kubeconfig --namespace=spark-model create secret generic spark-truststore --from-file spark.truststore

# Import the certificate to the local spark-client keystore
spark-client.import-certificate ceph-cert ceph-ca.pem

# Create the Kubernetes ServiceAccount whilst storing the configuration centrally
spark-client.service-account-registry create --username spark --namespace spark-model --primary --properties-file spark.conf --kubeconfig ./kubeconfig
Awesome. Let’s download some data from Kaggle, push it to our Ceph object store and run a simple psypark script to query it with Spark SQL.
pip install kaggle
sudo apt install unzip -y

# Check for a Kaggle token
if [ ! -f ${HOME}/.kaggle/kaggle.json ]; then
  echo "You first need to set up your Kaggle API token. Go to https://www.kaggle.com/ and create an API token or sign up"
  exit -1
fi

# Download a dataset from Kaggle
kaggle datasets download -d cityofLA/los-angeles-traffic-collision-data
unzip los-angeles-traffic-collision-data.zip
mc cp traffic-collision-data-from-2010-to-present.csv ceph-radosgw/data/

# Make a pyspark script to analyse the data
cat > pyspark-script.py <<EOF
df = spark.read.option("header", "true").csv("s3a://data/traffic-collision-data-from-2010-to-present.csv")
df.createOrReplaceTempView("collisions")
spark.sql("select \`DR Number\`, count(\`DR Number\`) as hit_count from collisions group by \`DR Number\` having count(\`DR Number\`) > 1").show()
quit()
EOF

# Run the pyspark script on the cluster
spark-client.spark-submit --username spark --namespace spark-model pyspark-script.py
Observe and debug
At this point you may be wondering where you can see the Spark job logs in the Spark History Server, or how to see the dashboards and monitor the environment from Grafana. The following commands will open those webapps for you:
At this point you’ll see the credentials to log in to your Juju dashboard, and a URL that you can paste into your browser in order to reach the dashboard. The dashboard is tunnelled through SSH for security.
In this post, we explored how to build an on-premise data hub with Canonical’s open source MAAS, Juju, charm tech and supported distros for Ceph, Kubernetes and Spark. And we learned through (hopefully) doing – or at least by following along. At the end of the journey we had a fully operational (ok, small-scale demo) data hub environment capable of running Spark jobs on Kubernetes and querying a data lake store founded on Ceph, all deployed on five physical home lab servers.
We did skip a step or two for brevity (Grafana and Spark History Server are not accessed over TLS, for instance – although they could be configured for this), but if you’d like to learn more about our full-stack, open source solutions for data intensive systems like Spark, then do get in touch. You can contact our commercial team here or chat with our engineers on Matrix here.
I hope you enjoyed this post. There are lots of features of Charmed Spark that we didn’t cover like Volcano gang scheduler support; or using Iceberg tables – which are features coming soon to the 3/stable track of the Charmed Spark solution. But new features are being shipped to our edge track all the time and I’ll be writing about them as they come available – so stay tuned.
Read more about Charmed Spark at the product page, or check the docs.
The Kubuntu Team are thrilled to announce significant updates to KubuQA, our streamlined ISO testing tool that has now expanded its capabilities beyond Kubuntu to support Ubuntu and all its other flavors. With these enhancements, KubuQA becomes a versatile resource that ensures a smoother, more intuitive testing process for upcoming releases, including the 24.04 Noble Numbat and the 24.10 Oracular Oriole.
What is KubuQA?
KubuQA is a specialized tool developed by the Kubuntu Team to simplify the process of ISO testing. Utilizing the power of Kdialog for user-friendly graphical interfaces and VirtualBox for creating and managing virtual environments, KubuQA allows testers to efficiently evaluate ISO images. Its design focuses on accessibility, making it easy for testers of all skill levels to participate in the development process by providing clear, guided steps for testing ISOs.
New Features and Extensions
The latest update to KubuQA marks a significant expansion in its utility:
Broader Coverage: Initially tailored for Kubuntu, KubuQA now supports testing ISO images for Ubuntu and all other Ubuntu flavors. This broadened coverage ensures that any Ubuntu-based community can benefit from the robust testing framework that KubuQA offers.
Support for Latest Releases: KubuQA has been updated to include support for the newest Ubuntu release cycles, including the 24.04 Noble Numbat and the upcoming 24.10 Oracular Oriole. This ensures that communities can start testing early and often, leading to more stable and polished releases.
Enhanced User Experience: With improvements to the Kdialog interactions, testers will find the interface more intuitive and responsive, which enhances the overall testing experience.
Call to Action for Ubuntu Flavor Leads
The Kubuntu Team is keen to collaborate closely with leaders and testers from all Ubuntu flavors to adopt and adapt KubuQA for their testing needs. We believe that by sharing this tool, we can foster a stronger, more cohesive testing community across the Ubuntu ecosystem.
We encourage flavor leads to try out KubuQA, integrate it into their testing processes, and share feedback with us. This collaboration will not only improve the tool but also ensure that all Ubuntu flavors can achieve higher quality and stability in their releases.
Getting Involved
For those interested in getting involved with ISO testing using KubuQA:
Join the Community: Engage with the Kubuntu community for support and to connect with other testers. Your contributions and feedback are invaluable to the continuous improvement of KubuQA.
Conclusion
The enhancements to KubuQA signify our commitment to improving the quality and reliability of Ubuntu and its derivatives. By extending its coverage and simplifying the testing process, we aim to empower more contributors to participate in the development cycle. Whether you’re a seasoned tester or new to the community, your efforts are crucial to the success of Ubuntu.
We look forward to seeing how different communities will utilise KubuQA to enhance their testing practices. And by the way, have you thought about becoming a member of the Kubuntu Community? Join us today to make a difference in the world of open-source software!
I am happy to announce the availability of SysGlance, a simple and universal, Linux utility for generating a report for the host system. Imagine encountering a problem with a Linux system service or device. Typically, you would search for a solution by Googling the issue, hoping to find a fix. In most cases, you would […]
This is the first Incus feature release following our LTS!
As a reminder, feature releases are only supported until the next one comes out, usually on a monthly cadence. Critical production environments should stay on the LTS release instead.
In this release, we have a lot of small quality of life improvements throughout. A lot of those being first contributions from students of the University of Texas at Austin. Expect a lot more of those in Incus 6.2!
The full announcement and changelog can be found here. And for those who prefer videos, here’s the release overview video:
And as always, my company is offering commercial support on Incus, ranging from by-the-hour support contracts to one-off services on things like initial migration from LXD, review of your deployment to squeeze the most out of Incus or even feature sponsorship. You’ll find all details of that here: https://zabbly.com/incus
Donations towards my work on this and other open source projects is also always appreciated, you can find me on Github Sponsors, Patreon and Ko-fi.
O que têm em comum um esquentador, uma Kalashnikov e um automóvel? Neste episódio falámos sobre isso e ainda sobre distribuições GNU-Linux que não usam systemd; a recente apresentação do NextCloud Hub 8 - e as suas muitas novidades; como usar clientes de correio para Proton Mail; como enganar pessoas mal intencionadas com o Firefox Relay; como fazer inchar o vosso armazenamento com LVM subiquity e como lidar com pacientes psiquiátricos que usam demasiadas abas em Firefox.
Podem apoiar o podcast usando os links de afiliados do Humble Bundle, porque ao usarem esses links para fazer uma compra, uma parte do valor que pagam reverte a favor do Podcast Ubuntu Portugal.
E podem obter tudo isso com 15 dólares ou diferentes partes dependendo de pagarem 1, ou 8.
Achamos que isto vale bem mais do que 15 dólares, pelo que se puderem paguem mais um pouco mais visto que têm a opção de pagar o quanto quiserem.
Se estiverem interessados em outros bundles não listados nas notas usem o link https://www.humblebundle.com/?partner=PUP e vão estar também a apoiar-nos.
I recently discovered that there's an old software edition of the Oxford English Dictionary (the second edition) on archive.org for download. Not sure how legal this is, mind, but I thought it would be useful to get it running on my Ubuntu machine. So here's how I did that.
Firstly, download the file; that will give you a file called Oxford English Dictionary (Second Edition).iso, which is a CD image. We want to unpack that, and usefully there is 7zip in the Ubuntu archives which knows how to unpack ISO files.1 So, unpack the ISO with 7z x "Oxford English Dictionary (Second Edition).iso". That will give you two more files: OED2.DAT and SETUP.EXE. The .DAT file is, I think, all the dictionary entries in some sort of binary format (and is 600MB, so be sure you have the space for it). You can then run wine SETUP.EXE, which will install the software using wine, and that's all good.2 Choose a folder to install it in (I chose the same folder that SETUP.EXE is in, at which point it will create an OED subfolder in there and unpack a bunch of files into it, including OED.EXE).
That's the easy part. However, it won't quite work yet. You can see this by running wine OED/OED.EXE. It should start up OK, and then complain that there's no CDROM.
This is because it expects there to be a CDROM drive with the OED2.DAT file on it. We can set one up, though; we tell Wine to pretend that there's a CD drive connected, and what's on it. Run winecfg, and in the Drives tab, press Add… to add a new drive. I chose D: (which is a common Windows drive letter for a CD drive), and OK. Select your newly added D: drive and set the Path to be the folder where OED2.DAT is (which is wherever you unpacked the ISO file). Then say Show Advanced and change the drive Type to CD-ROM to tell Wine that you want this new drive to appear to be a CD. Say OK.
Now, when you wine OED/OED.EXE again, it should start up fine! Hooray, we're done! Except…
…that's not good. The app runs, but it looks like it's having font issues. (In particular, you can select and copy the text, even though it looks like a bunch of little squares, and if you paste that text into somewhere else it's real text! So this is some sort of font display problem.)
Fortunately, the OED app does actually come with the fonts it needs. Unfortunately, it seems to unpack them to somewhere (C:\WINDOWS\SYSTEM)3 that Wine doesn't appear to actually look at. What we need to do is to install those font files so Linux knows about them. You could click them all to install them, but there's a quicker way; copy them, from where the installer puts them, into our own font folder.
To do this...
first make a new folder to put them in: mkdir ~/.local/share/fonts/oed.
Then find out where the installer put the font files, as a real path on our Linux filesystem: winepath -u "C:/WINDOWS/SYSTEM". Let's say that that ends up being /home/you/.wine/dosdevices/c:/windows/system
Copy the TTF files from that folder (remembering to change the first path to the one that winepath output just now): cp /home/you/.wine/dosdevices/c:/windows/system/*.TTF ~/.local/share/fonts/oed
And tell the font system that we've added a bunch of new fonts: fc-cache
And now it all ought to work! Run wine OED/OED.EXE one last time…
and using 7zip is much easier than mounting the ISO file as a loopback thing ↩
There's a Microsoft Word macro that it offers to install; I didn't want that, and I have no idea whether it works ↩
Many years ago (2012!) I was invited to be part of "The Pastry Box Project", which described itself thus:
Each year, The Pastry Box Project gathers 30 people who are each influential in their field and asks them to share thoughts regarding what they do. Those thoughts are then published every day throughout the year at a rate of one per day, starting January 1st and ending December 31st.
It was interesting. Sadly, it's dropped off the web (as has its curator, Alex Duloz, as far as I can tell), but thankfully the Wayback Machine comes to the rescue once again.1 I was quietly proud of some of the things I wrote there (and I was recently asked for a reference to a thing I said which the questioner couldn't find, which is what made me realise that the site's not around any more), so I thought I'd republish the stuff I wrote there, here, for ease of finding. This was all written in 2012, and the world has moved on in a few ways since then, a dozen years ago at time of writing, but... I think I'd still stand by most of this stuff. The posts are still at archive.org and you can get to and read other people's posts from there too, some of which are really good and worth your time. But here are mine, so I don't lose them again.
Tuesday, 18 December 2012
My daughter’s got a smartphone, because, well, everyone has. It has GPS on it, because, well, every one does. What this means is that she will never understand the concept of being lost.
Think about that for a second. She won’t ever even know what it means to be lost.
Every argument I have in the pub now goes for about ten minutes before someone says, right, we’ve spent long enough arguing now, someone look up the correct answer on Wikipedia. My daughter won’t ever understand the concept of not having a bit of information available, of being confused about a matter of fact.
A while back, it was decreed that telephone directories are not subject to copyright, that a list of phone numbers is “information alone without a minimum of original creativity” and therefore held no right of ownership.
What instant access to information has provided us is a world where all the simple matters of fact are now yours; free for the asking. Putting data on the internet is not a skill; it is drudgery, a mechanical task for robots. Ask yourself: why do you buy technical books? It’s not for the information inside: there is no tech book anywhere which actually reveals something which isn’t on the web already. It’s about the voice; about the way it’s written; about how interesting it is. And that is a skill. Matters of fact are not interesting — they’re useful, right enough, but not interesting. Making those facts available to everyone frees up authors, creators, makers to do authorial creative things. You don’t have to spend all your time collating stuff any more: now you can be Leonardo da Vinci all the time. Be beautiful. Appreciate the people who do things well, rather than just those who manage to do things at all. Prefer those people who make you laugh, or make you think, or make you throw your laptop out of a window with annoyance: who give you a strong reaction to their writing, or their speaking, or their work. Because information wanting to be free is what creates a world of creators. Next time someone wants to build a wall around their little garden, ask yourself: is what you’re paying for, with your time or your money or your personal information, something creative and wonderful? Or are they just mechanically collating information? I hope to spend 2013 enjoying the work of people who do something more than that.
Wednesday, 31 October 2012
Not everyone who works with technology loves technology. No, really, it’s true! Most of the people out there building stuff with web tech don’t attend conferences, don’t talk about WebGL in the pub, don’t write a blog with CSS3 “experiments” in it, don’t like what they do. It’s a job: come in at 9, go home at 5, don’t think about HTML outside those hours. Apparently 90% of the stuff in the universe is “dark matter”: undetectable, doesn’t interact with other matter, can’t be seen even with a really big telescope. Our “dark matter developers”, who aren’t part of the community, who barely even know that the community exists… how are we to help them? You can write all the A List Apart articles you like but dark matter developers don’t read it. And so everyone’s intranet is horrid and Internet-Explorer-specific and so the IE team have to maintain backwards compatibility with that and that hurts the web. What can we do to reach this huge group of people? Everyone’s written a book about web technologies, and books help, but books are dying. We want to get the word out about all the amazing things that are now possible to everyone: do we know how? Do we even have to care? The theory is that this stuff will “trickle down”, but that doesn’t work for economics: I’m not sure it works for @-moz-keyframes either.
Monday, 8 October 2012
The web moves really fast. How many times have you googled for a tutorial on or an example of something and found that the results, written six months or a year or two years ago, no longer work? The syntax has changed, or there’s a better way now, or it never worked right to begin with. You’ll hear people bemoaning this: trying to stop the web moving so quickly in order that knowledge about it doesn’t go out of date. But that ship’s sailed. This is the world we’ve built: it moves fast, and we have to just hat up and deal with it. So, how? How can we make sure that old and wrong advice doesn’t get found? It’s a difficult question, and I don’t think anyone’s seriously trying to answer it. We should try and think of a way.
Tuesday, 18 September 2012
Software isn’t always a solution to problems. If you’re a developer, everything generally looks like a nail: a nail which is solved by making a new bit of code. I’ve got half-finished mobile apps done for tracking my running with GPS, for telling me when to switch between running and walking, and… I’m still fat, because I’m writing software instead of going running. One of the big ideas behind computers was to automate repetitive and boring tasks, certainly, which means that it should work like this: identify a thing that needs doing, do it for a while, think “hm, a computer could do this more easily”, write a bit of software to do it. However, there’s too much premature optimisation going on, so it actually looks like this: identify a thing that needs doing, think “hm, I’m sure a computer would be able to do this more easily”, write a bit of software to do it. See the difference? If the software never gets finished, then in the first approach the thing still gets done. Don’t always reach for the keyboard: sometimes it’s better to reach for Post-It notes, or your running shoes.
Saturday, 18 August 2012
Changing the world is within your grasp.
This is not necessarily a good thing.
If you go around and talk to normal people, it becomes clear that, weirdly, they don’t ever imagine how to get ten million dollars. They don’t think about new ways to redesign a saucepan or the buttons in their car. They don’t contemplate why sending a parcel is slow and how it could be a slicker process. They don’t think about ways to change the world.
I find it hard to talk to someone who doesn’t think like that.
To an engineer, the world is a toy box full of sub-optimized and feature-poor toys, as Scott Adams once put it. To a designer, the world is full of bad design. And to both, it is not only possible but at a high level obvious how to (a) fix it (b) for everyone (c) and make a few million out of doing so.
At first, this seems a blessing: you can see how the world could be better! And make it happen!
Then it’s a curse. Those normal people I mentioned? Short of winning the lottery or Great Uncle Brewster dying, there’s no possibility of becoming a multi-millionaire, and so they’re not thinking about it. Doors that have a handle on them but say “Push” are not a source of distress. Wrong kerning in signs is not like sandpaper on their nerves.
The curse of being able to change the world is… the frustration that you have so far failed to do so.
Perhaps there is a Zen thing here. Some people have managed it. Maybe you have. So the world is better, and that’s a good thing all by itself, right?
Friday, 27 July 2012
The best systems are built by people who can accept that no-one will ever know how hard it was to do, and who therefore don’t seek validation by explaining to everyone how hard it was to do.
Tuesday, 12 June 2012
The most poisonous idea in the world is when you’re told that something which achieved success through lots of hard work actually got there just because it was excellent.
Friday, 18 May 2012
Ever notice how the things you slave over and work crushingly hard on get less attention, sometimes, than the amusing things you threw together in a couple of evenings?
I can't decide whether this is a good thing or not.
Thursday, 5 April 2012
It's OK to not want to build websites for everybody and every browser. Making something which is super-dynamic in Chrome 18 and also works excellently in w3m is jolly hard work, and a lot of the time you might well be justified in thinking it's not worth it. If your site stats, or your belief, or your prediction of the market's direction, or your favourite pundit tell you that the best use of your time is to only support browsers with querySelector, or only support browsers with JavaScript, or only support WebKit, or only support iOS Safari, then that's a reasonable decision to make; don't let anyone else tell you what your relationship with your users and customers and clients is, because you know better than them.
Just don't confuse what you're doing with supporting "the web". State your assumptions up front. Own your decisions, and be prepared to back them up, for your project. If you're building something which doesn't work in IE6, that requires JavaScript, that requires mobile WebKit, that requires Opera Mobile, then you are letting some people down. That's OK; you've decided to do that. But your view's no more valid than theirs, for a project you didn't build. Make your decisions, and state what the axioms you worked from were, and then everyone else can judge whether what you care about is what they care about. Just don't push your view as being what everyone else should do, and we'll all be fine.
Sunday, 18 March 2012
Publish and be damned, said the Duke of Wellington; these days, in between starting wars in France and being sick of everyone repeating the jokes about his name from Blackadder, he’d probably say that we should publish or be damned. If you’re anything like me, you’ve got folders full of little experiments that you never got around to finishing or that didn’t pan out. Put ’em up somewhere. These things are useful.
Twitter, autobiographies, collections of letters from authors, all these have shown us that the minutiae can be as fascinating as carefully curated and sieved and measured writings, and who knows what you’ll inspire the next person to do from the germ of one of your ideas?
Monday, 27 February 2012
There's a lot to think about when you're building something on the web. Is it accessible? How do I handle translations of the text? Is the design OK on a 320px-wide screen? On a 2320px-wide screen? Does it work in IE8? In Android 4.0? In Opera Mini? Have I minimized the number of HTTP requests my page requires? Is my JavaScript minified? Are my images responsive? Is Google Analytics hooked up properly? AdSense? Am I handling Unicode text properly? Avoiding CSRF? XSS? Have I encoded my videos correctly? Crushed my pngs? Made a print stylesheet?
We've come a long way since:
<HEADER>
<TITLE>The World Wide Web project</TITLE>
<NEXTID N="55">
</HEADER>
<BODY>
<H1>World Wide Web</H1>The WorldWideWeb (W3) is a wide-area<A
NAME=0 HREF="WhatIs.html">
hypermedia</A> information retrieval
initiative aiming to give universal
access to a large universe of documents.
Look at http://html5boilerplate.com/—a base level page which helps you to cover some (nowhere near all) of the above list of things to care about (and the rest of the things you need to care about too, which are the other 90% of the list). A year in development, 900 sets of changes and evolutions from the initial version, seven separate files. That's not over-engineering; that's what you need to know to build things these days.
The important point is: one of the skills in our game is knowing what you don't need to do right now but still leaving the door open for you to do it later. If you become the next Facebook then you will have to care about all these things; initially you may not. You don't have to build them all on day one: that is over-engineering. But you, designer, developer, translator, evangelist, web person, do have to understand what they all mean. And you do have to be able to layer them on later without having to tear everything up and start again. Feel guilty that you're not addressing all this stuff in the first release if necessary, but you should feel a lot guiltier if you didn't think of some of it.
Wednesday, 18 January 2012
Don't be creative. Be a creator. No one ever looks back and wishes that they'd given the world less stuff.
One of the things I do as a side project for Freexian is to work on
various bits of business automation: accounting tools, programs to help
contributors report their hours, invoicing, that kind of thing. While
it’s not quite my usual beat, this makes quite a good side project as
the tools involved are mostly rather sensible and easy to deal with
(Python, git, ledger, that sort of thing)
and it’s the kind of thing where I can dip into it for a day or so a
week and feel like I’m making useful contributions. The logic can be
quite complex, but there’s very little friction in the tools themselves.
A recent case where I did run into some friction in the tools was with
some commands that need to present small amounts of tabular data on the
terminal, using OSC
8
hyperlinks if the terminal supports them: think customer-related
information with some links to issues. One of my colleagues had
previously done this using a
hack on top of
texttable, which was perfectly
fine as far as it went. However, now I wanted to be able to add multiple
links in a single table cell in some cases, and that was really going to
stretch the limits of that approach: working out the width of the
displayed text in the cell was going to take an annoying amount of bookkeeping.
I started looking around to see whether any other approaches might be
easier, without too much effort (remember that “a day or so a week” bit
above). ansiwrap looked
somewhat promising, but it isn’t currently packaged in Debian, and it
would have still left me with the problem of figuring out how to
integrate it into texttable, which looked like it would be quite
complicated. Then I remembered that I’d heard good things about
rich, and thought I’d take a look.
rich turned out to be exactly what I wanted. Instead of something
like this based on the texttable hack above:
While this is a little shorter, the real bonus is that I can now just
put multiple [link] tags in a single string, and it all just works.
No ceremony. In fact, once the relevant bits of code passed
type-checking (since the real code is a bit more complex than the
samples above), it worked first time. It’s a pleasure to work with a
library like that.
It looks like I’ve only barely scratched the surface of rich, but I
expect I’ll reach for it more often now.
<figcaption>
The “Secure Rollback Prevention” entry in the UEFI BIOS configuration
</figcaption>
The bottom line is that there is a new configuration called “AMD Secure Processor Rollback protection” on recent AMD systems in addition to “Secure Rollback Prevention” (BIOS rollback protection). If it’s enabled by a vendor, you cannot downgrade the UEFI BIOS revisions once you install a one with security vulnerability fixes.
This feature prevents an attacker from loading an older firmware onto the part after a security vulnerability has been fixed.
[…]
End users are not able to directly modify rollback protection, this is controlled by the manufacturer.
Previously I installed the revision 1.49 (R23ET73W) but it’s gone from Lenovo’s official page with the notice below. I’ve been annoyed by a symptom which is likely from a firmware so I wanted to try multiple revisions for bisecting, and also I thought I should downgrade it to the latest official revision as 1.40 (R23ET70W) since the withdrawal clearly indicates that there is something wrong with 1.49.
This BIOS version R23UJ73W is reported Lenovo cloud not working issue, hence it has been withdrawn from support site.
First, I turned off Secure Rollback Prevention and tried downgrading it with fwupdmgr like the following. However, it failed to be applied with Secure Flash Authentication Failed when rebooted.
Next, I tried their ISO image r23uj70wd.iso, but no luck with another error.
Error
The system program file is not correct for this system.
Also, Windows failed to apply it so I became convinced it was impossible. However, I didn’t have a clear idea why at that point and bumped into a handy command in fwupdmgr.
As you can see, the BIOS rollback protection in the HSI-2 section is “Disabled” as intended. But Processor rollback protection in HSI-4 is “Enabled”. I found a commit suggesting that there was a system with the config disabled and it was able to be enabled when OS Optimized Defaults is turned on.
Some configurations were overridden, but the Processor rollback protection stayed the same. It’s confirmed that it’s really impossible to downgrade the firmware with vulnerability fixes. I learned the hard way that there was a clear difference between “a vendor doesn’t support downgrading” and “it can’t be downgraded” as per the release notes.
Depois da catástrofe de Alderaan, a princesa Leia no exílio veio falar connosco e passámos um bom bocado a falar de Raspberry Pi, as tendências genocidas do Império Galáctico, o papel de jornalistas e developers místicos e como fazer parte dos Rebeldes usando Tor. Abordámos brevemente o drama dos debs no Noble Numbat, dramas na comunidade de Nix e o drama de não fazer backups. E ainda houve tempo para partilhar experiências no Centro Linux, dizer mal do Linkedin e rever a agenda para os próximos meses.
Podem apoiar o podcast usando os links de afiliados do Humble Bundle, porque ao usarem esses links para fazer uma compra, uma parte do valor que pagam reverte a favor do Podcast Ubuntu Portugal.
E podem obter tudo isso com 15 dólares ou diferentes partes dependendo de pagarem 1, ou 8.
Achamos que isto vale bem mais do que 15 dólares, pelo que se puderem paguem mais um pouco mais visto que têm a opção de pagar o quanto quiserem.
Se estiverem interessados em outros bundles não listados nas notas usem o link https://www.humblebundle.com/?partner=PUP e vão estar também a apoiar-nos.
My Debian contributions this month were all
sponsored by Freexian.
I’m trying to get back into bugs.debian.org administration, so I spent
some time catching up on my owner@bugs.debian.org mailbox and answering
a number of support requests there.
I fixed a regression I’d introduced last year where groff’s PDF output
had invalid date headers, both
upstream
and in Debian.
I fixed a
mistake
in a Debian patch to python-ecdsa, noticed while updating jsonpickle.
I updated cachelib, dnsdiag, feedparser, jsonpickle, pywavelets
(fixing a distutils dependency),
python-aiohttp-session, python-avro, python-rstr, vine (including an
upstream packaging tweak,
and wtforms to new upstream versions.
I did some inconclusive investigation of flaky tests in
gcr4. More work is needed there.
I proposed a patch for a build failure in gyoto, both
upstream and in
Debian.
The previous release of uCareSystem, version 24.04.0, introduced enhanced maintenance and cleanup capabilities for Ubuntu and its derivatives. The fresh new release 24.05, is introduced with support for flatpak maintenance. This new version includes: Where can I download uCareSystem ? As always, I want to express my gratitude for your support over the past 15 […]
Thanks to a colleague who introduced me to Nim during last week’s SUSE Labs conference, I became a man with a dream, and after fiddling with compiler flags
and obviously not reading documentation, I finally made it.
This is something that shouldn’t exist; from the list of ideas that should never have happened.
But it does.
It’s a Perl interpreter embedded in Rust.
Get over it.
Once cloned, you can run the following commands to see it in action:
cargo run --verbose -- hello.pm showtime
cargo run --verbose -- hello.pm get_quick_headers
How it works
There is a lot of autogenerated code, mainly for two things:
bindings.rs and wrapper.h; I made a lot of assumptions and perlxsi.c may or may not be necessary in the future (see main::xs_init_rust), depends on how bad or terrible my C knowledge is by the time you’re reading this.
xs_init_rust function is the one that does the magic, as far as my understanding goes, by hooking up boot_DynaLoader to DynaLoader in Perl via ffi.
With those two bits in place, and thanks to the magic of the bindgen crate, and after some initialization, I decided to use Perl_call_argv, do note that Perl_ in this case comes from bindgen, I might change later the convention to ruperl or something to avoid confusion between that a and perl_parse or perl_alloc which (if I understand correctly) are exposed directly by the ffi interface.
What I ended up doing, is passing the same list of arguments (for now, or at least for this PoC), directly to Perl_call_argv, which will in turn, take the third argument and pass it verbatim as the call_argv
Right now hello.pm defines two sub routines, one to open a file, write something and print the time to stdout, and a second one that will query my blog, and show the headers. This is only example code, but enough
to demostrate that the DynaLoader works, and that the embedding also works :)
I got most of this working by following the perlembed guide.
Why?
Why not?.
I want to see if I can embed also python in the same binary, so I can call native perl, from native python and see how I can fiddle all that into os-autoinst
Where to find the code?
On github: https://github.com/foursixnine/ruperl or under https://crates.io/crates/ruperl
I’ve not had much time to play around with the latest release but this is cool – OneDrive Nautilus integration.
Settings > Online Accounts > Microsoft 365, leave everything blank and hit “Sign in…”. Web page opens to authenticate and then you can mount OneDrive in Nautilus.
Ubuntu 24.04 LTS was released just a few days ago and many Ubuntu users will now slowly plan their upgrades, whether it’s going to be over the next few days, weeks, months or years.
When it comes to running Incus on Ubuntu 24.04 LTS, there are a few options detailed below.
About Incus
Incus is a container and virtual machine manager which aims at providing a cloud-like experience but fully self-hosted and capable of running on just about anything, from a single board computer, to a laptop to a cluster of high end servers.
Incus was created following Canonical’s decision to make LXD a fully in-house project and it is actively maintained by the same team that once created LXD, almost 10 years ago. It’s part of the Linux Containers project and so benefits of all the infrastructure and experience in maintaining stable software over decades.
Native Incus packages
Incus 6.0 LTS is included directly in the Ubuntu Archive, making it very easy to install:
Simple container experience: apt install incus
Container and virtual-machines: apt install incus qemu-system-x86-64
To migrate from LXD: apt install incus-tools
Installing Incus that way is convenient as it doesn’t use external repositories nor does it rely on alternative packaging methods like snaps. That’s also the same set of Incus packages that will be shipped with Debian 13 (Trixie).
On the support front, this is using Incus 6.0 LTS and so uses a version of Incus that will be supported upstream for the next 5 years. The package itself is in the universe repository and so doesn’t come with security updates provided by Canonical as part of stock Ubuntu.
However Canonical now provides additional security updates to Ubuntu Pro users which includes both security updates and support for all 23000 packages in universe.
Those packages are quite different from the ones shipped directly in Ubuntu or Debian as they also directly include the most critical dependencies so that the whole solution can be tested and validated as a single unit.
That makes it much easier for me to provide timely fixes as well as commercial support for users of those packages. It also allows for decoupling the Incus installation/version from the OS version, making major system updates easier.
Packages are available for Ubuntu 20.04, 22.04 and now 24.04 LTS as well as Debian 11 and Debian 12.
Moving from LXD
Ubuntu 24.04 LTS ships with LXD 5.21, migrating from LXD 5.21 to Incus 6.0 LTS can be done very easily by running the “lxd-to-incus” command.
It supports very quickly and reliably migrating data from LXD installations as old as LXD 4.0.0 all the way to and including LXD 5.21.
Running Ubuntu 24.04 LTS on top of Incus
If you’re just looking at using Ubuntu 24.04 LTS but don’t want to upgrade your whole system yet, or you’re running another Linux distribution and just want to experiment with Ubuntu 24.04 LTS, you can easily do that through Incus.
Incus has the following images ready for use:
Ubuntu 24.04 LTS base image
Our default Ubuntu 24.04 LTS image. It’s pretty lightweight while still containing most expected tools for day to day operation.
It’s available for both containers (125MiB compressed) and virtual-machines (270MiB compressed).
Ubuntu 24.04 LTS cloud image
Our cloud-init enabled Ubuntu 24.04 LTS image, it’s basically the same as the default image but with cloud-init enabled for automated provisioning.
It’s available for both containers (150MiB compressed) and virtual-machines (305MiB compressed).
Ubuntu 24.04 LTS desktop image
Our desktop (Gnome) Ubuntu 24.04 LTS image, it boots directly into a pre-created user account and makes it extremely easy to try the latest Ubuntu Desktop experience.
This image is only available as a virtual-machine (1.1GiB compressed).
Conclusion
Hopefully this provided a pretty good overview of how to get Incus up and running on Ubuntu 24.04 LTS, either by moving from an existing LXD installation over to Incus or installing it fresh.
If you’d just like to learn more about Incus without having to install it locally, our online demo service is as great for that as ever!
A few weeks ago, in episode 25 of Linux Matters Podcast I brought up the subject of ‘Coding Joy’. This blog post is an expanded follow-up to that segment. Go and listen to that episode - or not - it’s all covered here.
Not a Developer
I’ve said this many times - I’ve never considered myself a ‘Developer’. It’s not so much imposter syndrome, but plain facts. I didn’t attend university to study software engineering, and have never held a job with ‘Engineer’ or Developer’ in the title.
(I do have Engineering Manager and Developer Advocate roles in my past, but in popey’s weird set of rules, those don’t count.)
I have written code over the years. Starting with BASIC on the Sinclair ZX81 and Sinclair Spectrum, I wrote stuff for fun and no financial gain. I also coded in Z80 & 6502 assembler, taught myself Pascal on my Epson 8086 PC in 1990, then QuickBasic and years later, BlitzBasic, Lua (via LÖVE) and more.
In the workplace, I wrote some alarmingly complex utilities in Windows batch scripts and later Bash shell scripts on Linux. In a past career, I would write ABAP in SAP - which turned into an internal product mildly amusingly called “Alan’s Tool”.
These were pretty much all coding for fun, though. Nobody specced up a project and assigned me as a developer on it. I just picked up the tools and started making something, whether that was a sprite routine in Z80 assembler, an educational CPU simulator in Pascal, or a spreadsheet uploader for SAP BiW.
In 2003, three years before Twitter launched in 2006, I made a service called ‘Clunky.net’. It was a bunch of PHP and Perl smashed together and published online with little regard for longevity or security. Users could sign up and send ’tweet’ style messages from their phone via SMS, which would be presented in a reverse-chronological timeline. It didn’t last, but I had fun making it while it did.
They were all fun side-quests.
None of this makes me a developer.
Volatile Memories
It’s rapidly approaching fifty years since I first wrote any code on my first computer. Back then, you’d typically write code and then either save it on tape (if you were patient) or disk (if you were loaded). Maybe you’d write it down - either before or after you typed it in - or perhaps you’d turn the computer off and lose it all.
When I studied for a BTEC National Diploma in Computer Studies at college, one of our classes was on the IBM PC with two floppy disc drives. The lecturer kept hold of all the floppies because we couldn’t be trusted not to lose, damage or forget them. Sometimes the lecturer was held up at the start of class, so we’d be sat twiddling our thumbs for a bit.
In those days, when you booted the PC with no floppy inserted, it would go directly into BASICA, like the 8-bit microcomputers before it. I would frequently start writing something, anything, to pass the time.
With no floppy disks on hand, the code - beautiful as it was - would be lost. The lecturer often reset the room when they entered, hitting a big red ‘Stop’ button, which instantly powered down all the computers, losing whatever ‘work’ you’d done.
I was probably a little irritated at the moment, just as I would when the RAM pack wobbled on my ZX81, losing everything. You move on, though, and make something else, or get on with your college work, and soon forget about it.
Or you bitterly remember it and write a blog post four decades later. Each to their own.
Sharing is Caring
This part was the main focus of the conversation when we talked about this on the show.
In the modern age, over the last ten to fifteen years or so, I’ve not done so much of the kind of coding I wrote about above. I certainly have done some stuff for work, mostly around packaging other people’s software as snaps or writing noddy little shell scripts. But I lost a lot of the ‘joy’ of coding recently.
Why?
I think a big part is the expectation that I’d make the code available to others. The public scrutiny others give your code may have been a factor. The pressure I felt that I should put my code out and continue to maintain it rather than throw it over the wall wouldn’t have helped.
I think I was so obsessed with doing the ‘right’ thing that coding ‘correctly’ or following standards and making it all maintainable became a cognitive roadblock.
I would start writing something and then begin wondering, ‘How would someone package this up?’ and ‘Am I using modern coding standards, toolkits, and frameworks?’ This held me back from the joy of coding in the first place. I was obsessing too much over other people’s opinions of my code and whether someone else could build and run it.
I never used to care about this stuff for personal projects, and it was a lot more joyful an experience - for me.
I used to have an idea, pick up a text editor and start coding. I missed that.
Realisation
In January this year, Terence Edenwrote about his escapades making a FourSquare-like service using ActivityPub and OpenStreetMap. When he first mentioned this on Mastodon, I grabbed a copy of the code he shared and had a brief look at it.
The code was surprisingly simple, scrappy, kinda working, and written in PHP. I was immediately thrown back twenty years to my terrible ‘Clunky’ code and how much fun it was to throw together.
In February, I bumped into Terence at State of Open Con in London and took the opportunity to quiz him about his creation. We discussed his choice of technology (PHP), and the simple ’thrown together in a day’ nature of the project.
At that point, I had a bit of a light-bulb moment, realising that I could get back to joyful coding. I don’t have to share everything; not every project needs to be an Open-Source Opus.
I can open a text editor, type some code, and enjoy it, and that’s enough.
Joy Rediscovered
I had an idea for a web application and wanted to prototype something without too much technological research or overhead. So I created a folder on my home server, ran php -S 0.0.0.0:9000 in a terminal there, made a skeleton index.php and pointed a browser at the address. Boom! Application created!
I created some horribly insecure and probably unmaintainable PHP that will almost certainly never see the light of day.
I had fun doing it though. Which is really the whole point.
Over coffee this morning, I stumbled upon simone, a fledgling Open-Source tool for repurposing YouTube videos as blog posts. The Python tool creates a text summary of the video and extracts some contextual frames to illustrate the text.
A neat idea! In my experience, software engineers are often tasked with making demonstration videos, but other engineers commonly prefer consuming the written word over watching a video. I took simone for a spin, to see how well it works. Scroll down and tell me what you think!
I was sat in front of my work laptop, which is a mac, so roughly speaking, this is what I did:
(.venv) $ python src/main.py
Enter YouTube URL: https://www.youtube.com/watch?v=VDIAHEoECfM
/Users/alan/Work/rajtilakjee/simone/.venv/lib/python3.12/site-packages/whisper/transcribe.py:115: UserWarning: FP16 is not supported on CPU; using FP32 instead
warnings.warn("FP16 is not supported on CPU; using FP32 instead")Traceback (most recent call last):
File "/Users/alan/Work/rajtilakjee/simone/.venv/lib/python3.12/site-packages/pytesseract/pytesseract.py", line 255, in run_tesseract
proc = subprocess.Popen(cmd_args, **subprocess_args()) ^^^^^^^^^^^^^^^^^^^^^^^^^^^^^^^^^^^^^^^^^^^^^^^
File "/opt/homebrew/Cellar/python@3.12/3.12.3/Frameworks/Python.framework/Versions/3.12/lib/python3.12/subprocess.py", line 1026, in __init__
self._execute_child(args, executable, preexec_fn, close_fds,
File "/opt/homebrew/Cellar/python@3.12/3.12.3/Frameworks/Python.framework/Versions/3.12/lib/python3.12/subprocess.py", line 1955, in _execute_child
raise child_exception_type(errno_num, err_msg, err_filename)FileNotFoundError: [Errno 2] No such file or directory: 'C:/Program Files/Tesseract-OCR/tesseract.exe'During handling of the above exception, another exception occurred:
Traceback (most recent call last):
File "/Users/alan/Work/rajtilakjee/simone/src/main.py", line 47, in <module>
blogpost(url) File "/Users/alan/Work/rajtilakjee/simone/src/main.py", line 39, in blogpost
score = scores.score_frames() ^^^^^^^^^^^^^^^^^^^^^
File "/Users/alan/Work/rajtilakjee/simone/src/utils/scorer.py", line 20, in score_frames
extracted_text = pytesseract.image_to_string( ^^^^^^^^^^^^^^^^^^^^^^^^^^^^
File "/Users/alan/Work/rajtilakjee/simone/.venv/lib/python3.12/site-packages/pytesseract/pytesseract.py", line 423, in image_to_string
return{ ^
File "/Users/alan/Work/rajtilakjee/simone/.venv/lib/python3.12/site-packages/pytesseract/pytesseract.py", line 426, in <lambda>
Output.STRING: lambda: run_and_get_output(*args),
^^^^^^^^^^^^^^^^^^^^^^^^^
File "/Users/alan/Work/rajtilakjee/simone/.venv/lib/python3.12/site-packages/pytesseract/pytesseract.py", line 288, in run_and_get_output
run_tesseract(**kwargs) File "/Users/alan/Work/rajtilakjee/simone/.venv/lib/python3.12/site-packages/pytesseract/pytesseract.py", line 260, in run_tesseract
raise TesseractNotFoundError()pytesseract.pytesseract.TesseractNotFoundError: C:/Program Files/Tesseract-OCR/tesseract.exe is not installed or it's not in your PATH. See README file for more information.
(.venv) python src/main.py
Enter YouTube URL: https://www.youtube.com/watch?v=VDIAHEoECfM
/Users/alan/Work/rajtilakjee/simone/.venv/lib/python3.12/site-packages/whisper/transcribe.py:115: UserWarning: FP16 is not supported on CPU; using FP32 instead
 warnings.warn("FP16 is not supported on CPU; using FP32 instead")
Look for results
(.venv) $ ls -l generated_blogpost.txt *.jpg
-rw-r--r-- 1 alan staff 216326 Apr 09:26 generated_blogpost.txt
-rw-r--r--@ 1 alan staff 13298426 Apr 09:27 top_frame_4_score_106.jpg
-rw-r--r-- 1 alan staff 18470526 Apr 09:27 top_frame_5_score_105.jpg
-rw-r--r-- 1 alan staff 12614826 Apr 09:27 top_frame_9_score_101.jpg
In my test I pointed simone at a short demo video from my employer, Anchore’sYouTube channel. The results are below, with no editing, I even included the typos. The images at the bottom of this post are frames from the video that simone selected.
Static stick checker tool helps developers identify security vulnerabilities in Docker images by running open-source security checks and generating remediation recommendations. This blog post summarizes a live demo of the tool’s capabilities.
How it works
The tool works by:
Downloading and analyzing the Docker image.
Detecting the base operating system distribution and selecting the appropriate stick profile.
Running open-source security checks on the image.
Generating a report of identified vulnerabilities and remediation actions.
Demo Walkthrough
The demo showcases the following steps:
Image preparation: Uploading a Docker image to a registry.
Tool execution: Running the static stick checker tool against the image.
Results viewing: Analyzing the generated stick results and identifying vulnerabilities.
Remediation: Implementing suggested remediation actions by modifying the Dockerfile.
Re-checking: Running the tool again to verify that the fixes have been effective.
Key findings
The static stick checker tool identified vulnerabilities in the Docker image in areas such as:
Verifying file hash integrity.
Configuring cryptography policy.
Verifying file permissions.
Remediation scripts were provided to address each vulnerability.
By implementing the recommended changes, the security posture of the Docker image was improved.
Benefits of using the static stick checker tool
Identify security vulnerabilities early in the development process.
Automate the remediation process.
Shift security checks leftward in the development pipeline.
Reduce the burden on security teams by addressing vulnerabilities before deployment.
Conclusion
The Ancors static stick checker tool provides a valuable tool for developers to improve the security of their Docker images. By proactively addressing vulnerabilities during the development process, organizations can ensure their applications are secure and reduce the risk of security incidents
Here’s the images it pulled out:
Not bad! It could be better - getting the company name wrong, for one!
I can imagine using this to create a YouTube description, or use it as a skeleton from which a blog post could be created. I certainly wouldn’t just pipe the output of this into blog posts! But so many videos need better descriptions, and this could help!
The Kubuntu Team is happy to announce that Kubuntu 24.04 has been released, featuring the ‘beautiful’ KDE Plasma 5.27 simple by default, powerful when needed.
Codenamed “Noble Numbat”, Kubuntu 24.04 continues our tradition of giving you Friendly Computing by integrating the latest and greatest open source technologies into a high-quality, easy-to-use Linux distribution.
Note: For upgrades from 23.10, there may a delay of a few hours to days between the official release announcements and the Ubuntu Release Team enabling upgrades.
The Ubuntu Studio team is pleased to announce the release of Ubuntu Studio 24.04 LTS, code-named “Noble Numbat”. This marks Ubuntu Studio’s 34th release. This release is a Long-Term Support release and as such, it is supported for 3 years (36 months, until April 2027).
Since it’s just out, you may experience some issues, so you might want to wait a bit before upgrading. Please see the release notes for a more complete list of changes and known issues. Listed here are some of the major highlights.
You can download Ubuntu Studio 24.04 LTS from our download page.
Special Notes
The Ubuntu Studio 24.04 LTS disk image (ISO) exceeds 4 GB and cannot be downloaded to some file systems such as FAT32 and may not be readable when burned to a standard DVD. For this reason, we recommend downloading to a compatible file system. When creating a boot medium, we recommend creating a bootable USB stick with the ISO image or burning to a Dual-Layer DVD.
Minimum installation media requirements: Dual-Layer DVD or 8GB USB drive.
Full updated information, including Upgrade Instructions, are available in the Release Notes.
Please note that upgrading from 22.04 before the release of 24.04.1,due August 2024, is unsupported.
Upgrades from 23.10 should be enabled within a month after release, so we appreciate your patience.
New This Release
All-New System Installer
In cooperation with the Ubuntu Desktop Team, we have an all-new Desktop installer. This installer uses the underlying code of the Ubuntu Server installer (“Subiquity”) which has been in-use for years, with a frontend coded in “Flutter”. This took a large amount of work for this release, and we were able to help a lot of other official Ubuntu flavors transition to this new installer.
Be on the lookout for a special easter egg when the graphical environment for the installer first starts. For those of you who have been long-time users of Ubuntu Studio since our early days (even before Xfce!), you will notice exactly what it is.
PipeWire 1.0.4
Now for the big one: PipeWire is now mature, and this release contains PipeWire 1.0. With PipeWire 1.0 comes the stability and compatibility you would expect from multimedia audio. In fact, at this point, we recommend PipeWire usage for both Professional, Prosumer, and Everyday audio needs. At Ubuntu Summit 2023 in Riga, Latvia, our project leader Erich Eickmeyer used PipeWire to demonstrate live audio mixing with much success and has since done some audio mastering work using it. JACK developers even consider it to be “JACK 3”.
PipeWire’s JACK compatibility is configured to use out-of-the-box and is zero-latency internally. System latency is configurable via Ubuntu Studio Audio Configuration.
However, if you would rather use straight JACK 2 instead, that’s also possible. Ubuntu Studio Audio Configuration can disable and enable PipeWire’s JACK compatibility on-the-fly. From there, you can simply use JACK via QJackCtl.
With this, we consider audio production with Ubuntu Studio so mature that it can now rival operating systems such as macOS and Windows in ease-of-use since it’s ready to go out-of-the-box.
Deprecation of PulseAudio/JACK setup/Studio Controls
Due to the maturity of PipeWire, we now consider the traditional PulseAudio/JACK setup, where JACK would be started/stopped by Studio Controls and bridged to PulseAudio, deprecated. This configuration is still installable via Ubuntu Studio Audio Configuration, but we do not recommend it. Studio Controls may return someday as a PipeWire fine-tuning solution, but for now it is unsupported by the developer. For that reason, we recommend users not use this configuration. If you do, it is at your own risk and no support will be given. In fact, it’s likely to be dropped for 24.10.
Ardour 8.4
While this does not represent the latest release of Ardour, Ardour 8.4 is a great release. If you would like the latest release, we highly recommend purchasing one-time or subscribing to Ardour directly from the developers to help support this wonderful application. Also, for that reason, this will be an application we will not directly backport. More on that later.
Ubuntu Studio Audio Configuration
Ubuntu Studio Audio Configuration has undergone a UI overhaul and contains the ability to start and stop a Dummy Audio Device which can also be configured to start or stop upon login. When assigned as the default, this will free-up channels that would normally be assigned to your system audio to be assigned to a null device.
Meta Package for Music Education
In cooperation with Edubuntu, we have created a metapackage for music education. This package is installable from Ubuntu Studio Installer and includes the following packages:
FMIT: Free Musical Instrument Tuner, a tool for tuning musical Instruments (also included by default)
GNOME Metronome: Exactly what it sounds like (pun unintended): a metronome.
Minuet: Ear training for intervals, chords, scales, and more.
MuseScore: Create, playback, and print sheet music for free (this one is no stranger to the Ubuntu Studio community)
Piano Booster: MIDI player/game that displays musical notes and teaches you how to play piano, optionally using a MIDI keyboard.
Solfege: Ear training program for harmonic and melodic intervals, chords, scales, and rhythms.
Deprecation of Ubuntu Studio Backports Is In Effect
As stated in the Ubuntu 23.10 Release Announcement, the Ubuntu Studio Backports PPA is now deprecated in favor of the official Ubuntu Backports repository. However, the Backports repository only works for LTS releases and for good reason. There are a few requirements for backporting:
It must be an application which already exists in the Ubuntu repositories
It must be an application which would not otherwise qualify for a simple bugfix, which would then qualify it to be a Stable Release Update. This means it must have new features.
It must not rely on new libraries or new versions of libraries.
It must exist within a later supported release or the development release of Ubuntu.
If you have a suggestion for an application for which to backport that meets those requirements, feel free to join and email the Ubuntu Studio Users Mailing List with your suggestion with the tag “[BPO]” at the beginning of the subject line. Backports to 22.04 LTS are now closedand backports to 24.04 LTS are now open. Additionally, suggestions must pertain to Ubuntu Studio and preferably must be applications included with Ubuntu Studio. Suggestions can be rejected at the Project Leader’s discretion.
One package that is exempt to backporting is Ardour. To help support Ardour’s funding, you may obtain later versions directly from them. To do so, please one-time purchase or subscribe to Ardour from their website. If you wish to get later versions of Ardour from us, you will have to wait until the next regular release of Ubuntu Studio, due in October 2024.
We’re back on Matrix
You’ll notice that the menu links to our support chat and on our website will now take you to a Matrix chat. This is due to the Ubuntu community carving its own space within the Matrix federation.
However, this is not only a support chat. This is also a creativity discussion chat. You can pass ideas to each other and you’re welcome to it if the topic remains within those confines. However, if a moderator or admin warns you that you’re getting off-topic (or the intention for the chat room), please heed the warning.
This is a persistent connection, meaning if you close the window (or chat), it won’t lose your place as you may only need to sign back in to resume the chat.
Frequently Asked Questions
Q: Does Ubuntu Studio contain snaps? A: Yes. Mozilla’s distribution agreement with Canonical changed, and Ubuntu was forced to no longer distribute Firefox in a native .deb package. We have found that, after numerous improvements, Firefox now performs just as well as the native .deb package did.
Thunderbird also became a snap during this cycle for the maintainers to get security patches delivered faster.
Additionally, Freeshow is an Electron-based application. Electron-based applications cannot be packaged in the Ubuntu repositories in that they cannot be packaged in a traditional Debian source package. While such apps do have a build system to create a .deb binary package, it circumvents the source package build system in Launchpad, which is required when packaging for Ubuntu. However, Electron apps also have a facility for creating snaps, which can be uploaded and included. Therefore, for Freeshow to be included in Ubuntu Studio, it had to be packaged as a snap.
Q: Will you make an ISO with {my favorite desktop environment}? A: To do so would require creating an entirely new flavor of Ubuntu, which would require going through the Official Ubuntu Flavor application process. Since we’re completely volunteer-run, we don’t have the time or resources to do this. Instead, we recommend you download the official flavor for the desktop environment of your choice and use Ubuntu Studio Installer to get Ubuntu Studio – which does *not* convert that flavor to Ubuntu Studio but adds its benefits.
Q: What if I don’t want all these packages installed on my machine? A: Simply use the Ubuntu Studio Installer to remove the features of Ubuntu Studio you don’t want or need!
Looking Toward the Future
Plasma 6
Ubuntu Studio, in cooperation with Kubuntu, will be switching to Plasma 6 during the 24.10 development cycle. Likewise, Lubuntu will be switching to LXQt 2.0 and Qt 6, so the three flavors will be cooperating to do the move.
New Look
Ubuntu Studio has been using the same theming, “Materia” (except for the 22.04 LTS release which was a re-colored Breeze theme) since 19.04. However, Materia has gone dead upstream. To stay consistent, we found a fork called “Orchis” which seems to match closely and will be switching to that. More on that soon.
Minimal Installation
The new system installer has the capability to do minimal installations. This was something we did not have time to implement this cycle but intend to do for 24.10. This will let users install a minimal desktop to get going and then install what they need via Ubuntu Studio Installer. This will make a faster installation process but will not make the installation .iso image smaller. However, we have an idea for that as well.
Minimal Installation .iso Image
We are going to research what it will take to create a minimal installer .iso image that will function much like the regular .iso image minus the ability to install everything and allow the user to customize the installation via Ubuntu Studio Installer. This should lead to a much smaller initial download. Unlike creating a version with a different desktop environment, the Ubuntu Technical Board has been on record as saying this would not require going through the new flavor creation process. Our friends at Xubuntu recently did something similar.
Get Involved!
A wonderful way to contribute is to get involved with the project directly! We’re always looking for new volunteers to help with packaging, documentation, tutorials, user support, and MORE! Check out all the ways you can contribute!
Our project leader, Erich Eickmeyer, is now working on Ubuntu Studio at least part-time, and is hoping that the users of Ubuntu Studio can give enough to generate a monthly part-time income. Your donations are appreciated! If other distributions can do it, surely we can! See the sidebar for ways to give!
Special Thanks
Huge special thanks for this release go to:
Eylul Dogruel: Artwork, Graphics Design
Ross Gammon: Upstream Debian Developer, Testing, Email Support
Sebastien Ramacher:Upstream Debian Developer
Dennis Braun: Upstream Debian Developer
Rik Mills: Kubuntu Council Member, help with Plasma desktop
Scarlett Moore: Kubuntu Project Lead, help with Plasma desktop
Zixing Liu: Simplified Chinese translations in the installer
Simon Quigley: Lubuntu Release Manager, help with Qt items, Core Developer stuff, keeping Erich sane and focused
Steve Langasek: Help with livecd-rootfs changes to make the new installer work properly.
Dan Bungert: Subiquity, seed fixes
Dennis Loose: Ubuntu Desktop Provision (installer)
Mauro Gaspari: Tutorials, Promotion, and Documentation, Testing, keeping Erich sane
Krytarik Raido: IRC Moderator, Mailing List Moderator
Erich Eickmeyer: Project Leader, Packaging, Development, Direction, Treasurer
A Note from the Project Leader
When I started out working on Ubuntu Studio six years ago, I had a vision of making it not only the easiest Linux-based operating system for content creation, but the easiest content creation operating system… full-stop.
With the release of Ubuntu Studio 24.04 LTS, I believe we have achieved that goal. No longer do we have to worry about whether an application is JACK or PulseAudio or… whatever. It all just works! Audio applications can be patched to each other!
If an audio device doesn’t depend on complex drivers (i.e. if the device is class-compliant), it will just work. If a user wishes to lower the latency or change the sample rate, we have a utility that does that (Ubuntu Studio Audio Configuration). If a user wants to have finer control use pure JACK via QJackCtl, they can do that too!
I honestly don’t know how I would replicate this on Windows, and replicating on macOS would be much harder without downloading all sorts of applications. With Ubuntu Studio 24.04 LTS, it’s ready to go and you don’t have to worry about it.
Where we are now is a dream come true for me, and something I’ve been hoping to see Ubuntu Studio become. And now, we’re finally here, and I feel like it can only get better.
Ubuntu MATE 24.04 is more of what you like, stable MATE Desktop on top of current Ubuntu.
This release rolls up some fixes and more closely aligns with Ubuntu. Read on to learn more 👓️
Ubuntu MATE 24.04 LTS
Thank you! 🙇
I’d like to extend my sincere thanks to everyone who has played an active role in improving Ubuntu MATE for this release 👏
I’d like to acknowledge the close collaboration with all the Ubuntu flavour teams and the Ubuntu Foundations and Desktop Teams.
The assistance and support provided by Erich Eickmeyer (Ubuntu Studio), Simon Quigley (Lubuntu) and David Muhammed (Ubuntu Budgie) have been invaluable.
Thank you! 💚
There are no offline upgrade options for Ubuntu MATE. Please ensure you have
network connectivity to one of the official mirrors or to a locally accessible
mirror and follow the instructions above.
We are pleased to announce the release of the next version of our distro, 24.04 Long Term Support. The LTS version is supported for 3 years while the regular releases are supported for 9 months. The new release rolls-up various fixes and optimizations that the Ubuntu Budgie team have been released since the 22.04 release in April 2022: We also inherits hundreds of stability…
Thanks to the hard work from our contributors, Lubuntu 24.04 LTS has been released. With the codename Noble Numbat, Lubuntu 24.04 is the 26th release of Lubuntu, the 12th release of Lubuntu with LXQt as the default desktop environment. Download and Support Lifespan With Lubuntu 24.04 being a long-term support interim release, it will follow […]
The Xubuntu team is happy to announce the immediate release of Xubuntu 24.04.
Xubuntu 24.04, codenamed Noble Numbat, is a long-term support (LTS) release and will be supported for 3 years, until 2027.
Xubuntu 24.04, featuring the latest updates from Xfce 4.18 and GNOME 46.
Xubuntu 24.04 features the latest updates from Xfce 4.18, GNOME 46, and MATE 1.26. For new users and those coming from Xubuntu 22.04, you’ll appreciate the performance, stability, and improved hardware support found in Xubuntu 24.04. Xfce 4.18 is stable, fast, and full of user-friendly features. Enjoy frictionless bluetooth headphone connections and out-of-the-box touchpad support. Updates to our icon theme and wallpapers make Xubuntu feel fresh and stylish.
The final release images for Xubuntu Desktop and Xubuntu Minimal are available as torrents and direct downloads from xubuntu.org/download/.
As the main server might be busy in the first few days after the release, we recommend using the torrents if possible.
We’d like to thank everybody who contributed to this release of Xubuntu!
Highlights and Known Issues
Highlights
Xfce 4.18 is included and well-polished since it’s initial release in December 2022
Xubuntu Minimal is included as an officially supported subproject
GNOME Software has been replaced by Snap Store and GDebi
Snap Desktop Integration is now included for improved snap package support
Firmware Updater has been added to enable firmware updates in Xubuntu is included to support firmware updates from the Linux Vendor Firmware Service (LVFS)
Thunderbird is now distributed as a Snap package
Ubiquity has been replaced by the Flutter-based Ubuntu Installer to provide fast and user-friendly installation
Pipewire (and wireplumber) are now included in Xubuntu
Improved hardware support for bluetooth headphones and touchpads
Color emoji is now included and supported in Firefox, Thunderbird, and newer Gtk-based apps
Significantly improved screensaver integration and stability
Known Issues
The shutdown prompt may not be displayed at the end of the installation. Instead you might just see a Xubuntu logo, a black screen with an underscore in the upper left hand corner, or just a black screen. Press Enter and the system will reboot into the installed environment. (LP: #1944519)
Xorg crashes and the user is logged out after logging in or switching users on some virtual machines, including GNOME Boxes. (LP: #1861609)
You may experience choppy audio or poor system performance while playing audio, but only in some virtual machines (observed in VMware and VirtualBox)
OEM installation options are not currently supported or available, but will be included for Xubuntu 24.04.1
For more obscure known issues, information on affecting bugs, bug fixes, and a list of new package versions, please refer to the Xubuntu Release Notes.
The main Ubuntu Release Notes cover many of the other packages we carry and more generic issues.
Support
For support with the release, navigate to Help & Support for a complete list of methods to get help.
With the work that has been done in the debian-installer/netcfg merge-proposal !9 it is possible to install a standard Debian system, using the normal Debian-Installer (d-i) mini.iso images, that will come pre-installed with Netplan and all network configuration structured in /etc/netplan/.
In this write-up, I’d like to run you through a list of commands for experiencing the Netplan enabled installation process first-hand. For now, we’ll be using a custom ISO image, while waiting for the above-mentioned merge-proposal to be landed. Furthermore, as the Debian archive is going through major transitions builds of the “unstable” branch of d-i don’t currently work. So I implemented a small backport, producing updated netcfg and netcfg-static for Bookworm, which can be used as localudebs/ during the d-i build.
Let’s start with preparing a working directory and installing the software dependencies for our virtualized Debian system:
Next we’ll prepare a VM, by copying the EFI firmware files, preparing some persistent EFIVARs file, to boot from FS0:\EFI\debian\grubx64.efi, and create a virtual disk for our machine:
Finally, let’s launch the installer using a custom preseed.cfg file, that will automatically install Netplan for us in the target system. A minimal preseed file could look like this:
For this demo, we’re installing the full netplan.io package (incl. Python CLI), as the netplan-generator package was not yet split out as an independent binary in the Bookworm cycle. You can choose the preseed file from a set of different variants to test the different configurations:
We’re using the custom linux kernel and initrd.gz here to be able to pass the preseed URL as a parameter to the kernel’s cmdline directly. Launching this VM should bring up the normal debian-installer in its netboot/gtk form:
Now you can click through the normal Debian-Installer process, using mostly default settings. Optionally, you could play around with the networking settings, to see how those get translated to /etc/netplan/ in the target system.
After you confirmed your partitioning changes, the base system gets installed. I suggest not to select any additional components, like desktop environments, to speed up the process.
During the final step of the installation (finish-install.d/55netcfg-copy-config) d-i will detect that Netplan was installed in the target system (due to the preseed file provided) and opt to write its network configuration to /etc/netplan/ instead of /etc/network/interfaces or /etc/NetworkManager/system-connections/.
Done! After the installation finished, you can reboot into your virgin Debian Bookworm system.
To do that, quit the current Qemu process, by pressing Ctrl+C and make sure to copy over the EFIVARS.fd file that was written by grub during the installation, so Qemu can find the new system. Then reboot into the new system, not using the mini.iso image any more:
Finally, you can play around with your Netplan enabled Debian system! As you will find, /etc/network/interfaces exists but is empty, it could still be used (optionally/additionally). Netplan was configured in /etc/netplan/ according to the settings given during the d-i installation process.
In our case, we also installed the Netplan CLI, so we can play around with some of its features, like netplan status:
Thank you for following along the Netplan enabled Debian installation process and happy hacking! If you want to learn more, join the discussion at Salsa:installer-team/netcfg and find us at GitHub:netplan.
Ubuntu MATE 23.10 is more of what you like, stable MATE Desktop on top of current Ubuntu.
This release rolls up a number of bugs fixes and updates that continues to build on recent releases, where the focus has been on improving stability 🪨
Ubuntu MATE 23.10
Thank you! 🙇
I’d like to extend my sincere thanks to everyone who has played an active role in improving Ubuntu MATE for this release 👏 From reporting bugs, submitting translations, providing patches, contributing to our crowd-funding, developing new features, creating artwork, offering community support, actively
testing and providing QA feedback to writing documentation or creating this fabulous website. Thank you! 💚
MATE Desktop has been updated to 1.26.2 with a selection of bugs fixes 🐛 and minor improvements 🩹 to associated components.
caja-rename 23.10.1-1 has been ported from Python to C.
libmatemixer 1.26.0-2+deb12u1 resolves heap corruption and application crashes when removing USB audio devices.
mate-desktop 1.26.2-1 improves portals support.
mate-notification-daemon 1.26.1-1 fixes several memory leaks.
mate-system-monitor 1.26.0-5 now picks up libexec files from /usr/libexec
mate-session-manager 1.26.1-2 set LIBEXECDIR to /usr/libexec/ for correct interaction with mate-system-monitor ☝️
mate-user-guide 1.26.2-1 is a new upstream release.
mate-utils 1.26.1-1 fixes several memory leaks.
Yet more AI Generated wallpaper
My friend Simon Butcher 🇬🇧 is Head of Research Platforms at Queen Mary University of London managing the Apocrita HPC cluster service. Once again, Simon has created a stunning AI-generated 🤖🧠 wallpaper for Ubuntu MATE using bleeding edge diffusion models 🖌 The sample below is 1920x1080 but the version included in Ubuntu MATE 23.10 are 3840x2160.
Here’s what Simon has to say about the process of creating this new wallpaper for Mantic Minotaur:
Since Minotaurs are imaginary creatures, interpretations tend to vary widely. I wanted to produce an image of a powerful creature in a graphic novel style, although not gruesome like many depictions. The latest open source Stable Diffusion XL base model was trained at a higher resolution and the difference in quality has been noticeable, particularly at better overall consistency and detail, while reducing anatomical irregularities in images. The image was produced locally using Linux and an NVIDIA A100 80GB GPU, starting from an initial text prompt and refined using img2img, inpainting and upscaling features.
Major Applications
Accompanying MATE Desktop 1.26.2 🧉 and Linux 6.5 🐧 are Firefox 118 🔥🦊,
Celluloid 0.25 🎥, Evolution 3.50 📧, LibreOffice 7.6.1 📚
See the Ubuntu 23.10 Release Notes
for details of all the changes and improvements that Ubuntu MATE benefits from.
Download Ubuntu MATE 23.10
This new release will be first available for PC/Mac users.
You can upgrade to Ubuntu MATE 23.10 from Ubuntu MATE 23.04. Ensure that you
have all updates installed for your current version of Ubuntu MATE before you
upgrade.
Open the “Software & Updates” from the Control Center.
Select the 3rd Tab called “Updates”.
Set the “Notify me of a new Ubuntu version” drop down menu to “For any new version”.
Press Alt+F2 and type in update-manager -c -d into the command box.
Update Manager should open up and tell you: New distribution release ‘23.10’ is available.
If not, you can use /usr/lib/ubuntu-release-upgrader/check-new-release-gtk
Click “Upgrade” and follow the on-screen instructions.
There are no offline upgrade options for Ubuntu MATE. Please ensure you have
network connectivity to one of the official mirrors or to a locally accessible
mirror and follow the instructions above.
Feedback
Is there anything you can help with or want to be involved in? Maybe you just
want to discuss your experiences or ask the maintainers some questions. Please
come and talk to us.
Ubuntu Budgie 24.04 LTS (Noble Numbat) is a Long Term Support release with 3 years of support by your distro maintainers, from April 2024 to May 2027. These release notes showcase the key takeaways for 22.04 upgraders to 24.04. In these release notes the areas covered are: Quarter & half tiling is pretty much self-explaining. Dragging a window to the…
Years ago, at what I think I remember was DebConf 15, I hacked for a while
on debhelper to
write build-ids to debian binary control files,
so that the build-id (more specifically, the ELF note
.note.gnu.build-id) wound up in the Debian apt archive metadata.
I’ve always thought this was super cool, and seeing as how Michael Stapelberg
blogged
some great pointers around the ecosystem, including the fancy new debuginfod
service, and the
find-dbgsym-packages
helper, which uses these same headers, I don’t think I’m the only one.
At work I’ve been using a lot of rust,
specifically, async rust using tokio. To try and work on
my style, and to dig deeper into the how and why of the decisions made in these
frameworks, I’ve decided to hack up a project that I’ve wanted to do ever
since 2015 – write a debug filesystem. Let’s get to it.
Back to the Future
Time to admit something. I really love Plan 9. It’s
just so good. So many ideas from Plan 9 are just so prescient, and everything
just feels right. Not just right like, feels good – like, correct. The
bit that I’ve always liked the most is 9p, the network protocol for serving
a filesystem over a network. This leads to all sorts of fun programs, like the
Plan 9 ftp client being a 9p server – you mount the ftp server and access
files like any other files. It’s kinda like if fuse were more fully a part
of how the operating system worked, but fuse is all running client-side. With
9p there’s a single client, and different servers that you can connect to,
which may be backed by a hard drive, remote resources over something like SFTP, FTP, HTTP or even purely synthetic.
The interesting (maybe sad?) part here is that 9p wound up outliving Plan 9
in terms of adoption – 9p is in all sorts of places folks don’t usually expect.
For instance, the Windows Subsystem for Linux uses the 9p protocol to share
files between Windows and Linux. ChromeOS uses it to share files with Crostini,
and qemu uses 9p (virtio-p9) to share files between guest and host. If you’re
noticing a pattern here, you’d be right; for some reason 9p is the go-to protocol
to exchange files between hypervisor and guest. Why? I have no idea, except maybe
due to being designed well, simple to implement, and it’s a lot easier to validate the data being shared
and validate security boundaries. Simplicity has its value.
As a result, there’s a lot of lingering 9p support kicking around. Turns out
Linux can even handle mounting 9p filesystems out of the box. This means that I
can deploy a filesystem to my LAN or my localhost by running a process on top
of a computer that needs nothing special, and mount it over the network on an
unmodified machine – unlike fuse, where you’d need client-specific software
to run in order to mount the directory. For instance, let’s mount a 9p
filesystem running on my localhost machine, serving requests on 127.0.0.1:564
(tcp) that goes by the name “mountpointname” to /mnt.
Linux will mount away, and attach to the filesystem as the root user, and by default,
attach to that mountpoint again for each local user that attempts to use
it. Nifty, right? I think so. The server is able
to keep track of per-user access and authorization
along with the host OS.
WHEREIN I STYX WITH IT
Since I wanted to push myself a bit more with rust and tokio specifically,
I opted to implement the whole stack myself, without third party libraries on
the critical path where I could avoid it. The 9p protocol (sometimes called
Styx, the original name for it) is incredibly simple. It’s a series of client
to server requests, which receive a server to client response. These are,
respectively, “T” messages, which transmit a request to the server, which
trigger an “R” message in response (Reply messages). These messages are
TLV payload
with a very straight forward structure – so straight forward, in fact, that I
was able to implement a working server off nothing more than a handful of man
pages.
Later on after the basics worked, I found a more complete
spec page
that contains more information about the
unix specific variant
that I opted to use (9P2000.u rather than 9P2000) due to the level
of Linux specific support for the 9P2000.u variant over the 9P2000
protocol.
MR ROBOTO
The backend stack over at zoo is rust and tokio
running i/o for an HTTP and WebRTC server. I figured I’d pick something
fairly similar to write my filesystem with, since 9P can be implemented
on basically anything with I/O. That means tokio tcp server bits, which
construct and use a 9p server, which has an idiomatic Rusty API that
partially abstracts the raw R and T messages, but not so much as to
cause issues with hiding implementation possibilities. At each abstraction
level, there’s an escape hatch – allowing someone to implement any of
the layers if required. I called this framework
arigato which can be found over on
docs.rs and
crates.io.
/// Simplified version of the arigato File trait; this isn't actually
/// the same trait; there's some small cosmetic differences. The
/// actual trait can be found at:
///
/// https://docs.rs/arigato/latest/arigato/server/trait.File.html
trait File {
/// OpenFile is the type returned by this File via an Open call.
typeOpenFile: OpenFile;
/// Return the 9p Qid for this file. A file is the same if the Qid is
/// the same. A Qid contains information about the mode of the file,
/// version of the file, and a unique 64 bit identifier.
fnqid(&self) -> Qid;
/// Construct the 9p Stat struct with metadata about a file.
async fnstat(&self) -> FileResult<Stat>;
/// Attempt to update the file metadata.
async fnwstat(&mut self, s: &Stat) -> FileResult<()>;
/// Traverse the filesystem tree.
async fnwalk(&self, path: &[&str]) -> FileResult<(Option<Self>, Vec<Self>)>;
/// Request that a file's reference be removed from the file tree.
async fnunlink(&mut self) -> FileResult<()>;
/// Create a file at a specific location in the file tree.
async fncreate(
&mut self,
name: &str,
perm: u16,
ty: FileType,
mode: OpenMode,
extension: &str,
) -> FileResult<Self>;
/// Open the File, returning a handle to the open file, which handles
/// file i/o. This is split into a second type since it is genuinely
/// unrelated -- and the fact that a file is Open or Closed can be
/// handled by the `arigato` server for us.
async fnopen(&mut self, mode: OpenMode) -> FileResult<Self::OpenFile>;
}
/// Simplified version of the arigato OpenFile trait; this isn't actually
/// the same trait; there's some small cosmetic differences. The
/// actual trait can be found at:
///
/// https://docs.rs/arigato/latest/arigato/server/trait.OpenFile.html
trait OpenFile {
/// iounit to report for this file. The iounit reported is used for Read
/// or Write operations to signal, if non-zero, the maximum size that is
/// guaranteed to be transferred atomically.
fniounit(&self) -> u32;
/// Read some number of bytes up to `buf.len()` from the provided
/// `offset` of the underlying file. The number of bytes read is
/// returned.
async fnread_at(
&mut self,
buf: &mut [u8],
offset: u64,
) -> FileResult<u32>;
/// Write some number of bytes up to `buf.len()` from the provided
/// `offset` of the underlying file. The number of bytes written
/// is returned.
fnwrite_at(
&mut self,
buf: &mut [u8],
offset: u64,
) -> FileResult<u32>;
}
Thanks, decade ago paultag!
Let’s do it! Let’s use arigato to implement a 9p filesystem we’ll call
debugfs that will serve all the debug
files shipped according to the Packages metadata from the apt archive. We’ll
fetch the Packages file and construct a filesystem based on the reported
Build-Id entries. For those who don’t know much about how an apt repo
works, here’s the 2-second crash course on what we’re doing. The first is to
fetch the Packages file, which is specific to a binary architecture (such as
amd64, arm64 or riscv64). That architecture is specific to a
component (such as main, contrib or non-free). That component is
specific to a suite, such as stable, unstable or any of its aliases
(bullseye, bookworm, etc). Let’s take a look at the Packages.xz file for
the unstable-debugsuite, maincomponent, for all amd64 binaries.
This will return the Debian-style
rfc2822-like headers,
which is an export of the metadata contained inside each .deb file which
apt (or other tools that can use the apt repo format) use to fetch
information about debs. Let’s take a look at the debug headers for the
netlabel-tools package in unstable – which is a package named
netlabel-tools-dbgsym in unstable-debug.
So here, we can parse the package headers in the Packages.xz file, and store,
for each Build-Id, the Filename where we can fetch the .deb at. Each
.deb contains a number of files – but we’re only really interested in the
files inside the .deb located at or under /usr/lib/debug/.build-id/,
which you can find in debugfs under
rfc822.rs. It’s
crude, and very single-purpose, but I’m feeling a bit lazy.
Who needs dpkg?!
For folks who haven’t seen it yet, a .deb file is a special type of
.ar file, that contains (usually)
three files inside – debian-binary, control.tar.xz and data.tar.xz.
The core of an .ar file is a fixed size (60 byte) entry header,
followed by the specified size number of bytes.
[8 byte .ar file magic]
[60 byte entry header]
[N bytes of data]
[60 byte entry header]
[N bytes of data]
[60 byte entry header]
[N bytes of data]
...
First up was to implement a basic ar parser in
ar.rs. Before we get
into using it to parse a deb, as a quick diversion, let’s break apart a .deb
file by hand – something that is a bit of a rite of passage (or at least it
used to be? I’m getting old) during the Debian nm (new member) process, to take
a look at where exactly the .debug file lives inside the .deb file.
$ ar x netlabel-tools-dbgsym_0.30.0-1+b1_amd64.deb
$ ls
control.tar.xz debian-binary
data.tar.xz netlabel-tools-dbgsym_0.30.0-1+b1_amd64.deb
$ tar --list -f data.tar.xz | grep '.debug$'
./usr/lib/debug/.build-id/e5/9f81f6573dadd5d95a6e4474d9388ab2777e2a.debug
Since we know quite a bit about the structure of a .deb file, and I had to
implement support from scratch anyway, I opted to implement a (very!) basic
debfile parser using HTTP Range requests. HTTP Range requests, if supported by
the server (denoted by a accept-ranges: bytes HTTP header in response to an
HTTP HEAD request to that file) means that we can add a header such as
range: bytes=8-68 to specifically request that the returned GET body be the
byte range provided (in the above case, the bytes starting from byte offset 8
until byte offset 68). This means we can fetch just the ar file entry from
the .deb file until we get to the file inside the .deb we are interested in
(in our case, the data.tar.xz file) – at which point we can request the body
of that file with a final range request. I wound up writing a struct to
handle a read_at-style API surface in
hrange.rs, which
we can pair with ar.rs above and start to find our data in the .deb remotely
without downloading and unpacking the .deb at all.
After we have the body of the data.tar.xz coming back through the HTTP
response, we get to pipe it through an xz decompressor (this kinda sucked in
Rust, since a tokioAsyncRead is not the same as an http Body response is
not the same as std::io::Read, is not the same as an async (or sync)
Iterator is not the same as what the xz2 crate expects; leading me to read
blocks of data to a buffer and stuff them through the decoder by looping over
the buffer for each lzma2 packet in a loop), and tarfile parser (similarly
troublesome). From there we get to iterate over all entries in the tarfile,
stopping when we reach our file of interest. Since we can’t seek, but gdb
needs to, we’ll pull it out of the stream into a Cursor<Vec<u8>> in-memory
and pass a handle to it back to the user.
I was originally hoping to avoid transferring the whole tar file over the
network (and therefore also reading the whole debug file into ram, which
objectively sucks), but quickly hit issues with figuring out a way around
seeking around an xz file. What’s interesting is xz has a great primitive
to solve this specific problem (specifically, use a block size that allows you
to seek to the block as close to your desired seek position just before it,
only discarding at most block size - 1 bytes), but data.tar.xz files
generated by dpkg appear to have a single mega-huge block for the whole file.
I don’t know why I would have expected any different, in retrospect. That means
that this now devolves into the base case of “How do I seek around an lzma2
compressed data stream”; which is a lot more complex of a question.
Thankfully, notoriously brilliant tianon was
nice enough to introduce me to Jon Johnson
who did something super similar – adapted a technique to seek inside a
compressed gzip file, which lets his service
oci.dag.dev
seek through Docker container images super fast based on some prior work
such as soci-snapshotter, gztool, and
zran.c.
He also pulled this party trick off for apk based distros
over at apk.dag.dev, which seems apropos.
Jon was nice enough to publish a lot of his work on this specifically in a
central place under the name “targz”
on his GitHub, which has been a ton of fun to read through.
The gist is that, by dumping the decompressor’s state (window of previous
bytes, in-memory data derived from the last N-1 bytes) at specific
“checkpoints” along with the compressed data stream offset in bytes and
decompressed offset in bytes, one can seek to that checkpoint in the compressed
stream and pick up where you left off – creating a similar “block” mechanism
against the wishes of gzip. It means you’d need to do an O(n) run over the
file, but every request after that will be sped up according to the number
of checkpoints you’ve taken.
Given the complexity of xz and lzma2, I don’t think this is possible
for me at the moment – especially given most of the files I’ll be requesting
will not be loaded from again – especially when I can “just” cache the debug
header by Build-Id. I want to implement this (because I’m generally curious
and Jon has a way of getting someone excited about compression schemes, which
is not a sentence I thought I’d ever say out loud), but for now I’m going to
move on without this optimization. Such a shame, since it kills a lot of the
work that went into seeking around the .deb file in the first place, given
the debian-binary and control.tar.gz members are so small.
The Good
First, the good news right? It works! That’s pretty cool. I’m positive
my younger self would be amused and happy to see this working; as is
current day paultag. Let’s take debugfs out for a spin! First, we need
to mount the filesystem. It even works on an entirely unmodified, stock
Debian box on my LAN, which is huge. Let’s take it for a spin:
And, let’s prove to ourselves that this actually mounted before we go
trying to use it:
$ mount | grep build-id
192.168.0.2 on /usr/lib/debug/.build-id type 9p (rw,relatime,aname=unstable-debug,access=user,trans=tcp,version=9p2000.u,port=564)
Slick. We’ve got an open connection to the server, where our host
will keep a connection alive as root, attached to the filesystem provided
in aname. Let’s take a look at it.
$ ls /usr/lib/debug/.build-id/
00 0d 1a 27 34 41 4e 5b 68 75 82 8E 9b a8 b5 c2 CE db e7 f3
01 0e 1b 28 35 42 4f 5c 69 76 83 8f 9c a9 b6 c3 cf dc E7 f4
02 0f 1c 29 36 43 50 5d 6a 77 84 90 9d aa b7 c4 d0 dd e8 f5
03 10 1d 2a 37 44 51 5e 6b 78 85 91 9e ab b8 c5 d1 de e9 f6
04 11 1e 2b 38 45 52 5f 6c 79 86 92 9f ac b9 c6 d2 df ea f7
05 12 1f 2c 39 46 53 60 6d 7a 87 93 a0 ad ba c7 d3 e0 eb f8
06 13 20 2d 3a 47 54 61 6e 7b 88 94 a1 ae bb c8 d4 e1 ec f9
07 14 21 2e 3b 48 55 62 6f 7c 89 95 a2 af bc c9 d5 e2 ed fa
08 15 22 2f 3c 49 56 63 70 7d 8a 96 a3 b0 bd ca d6 e3 ee fb
09 16 23 30 3d 4a 57 64 71 7e 8b 97 a4 b1 be cb d7 e4 ef fc
0a 17 24 31 3e 4b 58 65 72 7f 8c 98 a5 b2 bf cc d8 E4 f0 fd
0b 18 25 32 3f 4c 59 66 73 80 8d 99 a6 b3 c0 cd d9 e5 f1 fe
0c 19 26 33 40 4d 5a 67 74 81 8e 9a a7 b4 c1 ce da e6 f2 ff
Outstanding. Let’s try using gdb to debug a binary that was provided by
the Debian archive, and see if it’ll load the ELF by build-id from the
right .deb in the unstable-debug suite:
$ gdb -q /usr/sbin/netlabelctl
Reading symbols from /usr/sbin/netlabelctl...
Reading symbols from /usr/lib/debug/.build-id/e5/9f81f6573dadd5d95a6e4474d9388ab2777e2a.debug...
(gdb)
Yes! Yes it will!
$ file /usr/lib/debug/.build-id/e5/9f81f6573dadd5d95a6e4474d9388ab2777e2a.debug
/usr/lib/debug/.build-id/e5/9f81f6573dadd5d95a6e4474d9388ab2777e2a.debug: ELF 64-bit LSB shared object, x86-64, version 1 (SYSV), dynamically linked, interpreter *empty*, BuildID[sha1]=e59f81f6573dadd5d95a6e4474d9388ab2777e2a, for GNU/Linux 3.2.0, with debug_info, not stripped
The Bad
Linux’s support for 9p is mainline, which is great, but it’s not robust.
Network issues or server restarts will wedge the mountpoint (Linux can’t
reconnect when the tcp connection breaks), and things that work fine on local
filesystems get translated in a way that causes a lot of network chatter – for
instance, just due to the way the syscalls are translated, doing an ls, will
result in a stat call for each file in the directory, even though linux had
just got a stat entry for every file while it was resolving directory names.
On top of that, Linux will serialize all I/O with the server, so there’s no
concurrent requests for file information, writes, or reads pending at the same
time to the server; and read and write throughput will degrade as latency
increases due to increasing round-trip time, even though there are offsets
included in the read and write calls. It works well enough, but is
frustrating to run up against, since there’s not a lot you can do server-side
to help with this beyond implementing the 9P2000.L variant (which, maybe is
worth it).
The Ugly
Unfortunately, we don’t know the file size(s) until we’ve actually opened the
underlying tar file and found the correct member, so for most files, we don’t
know the real size to report when getting a stat. We can’t parse the tarfiles
for every stat call, since that’d make ls even slower (bummer). Only
hiccup is that when I report a filesize of zero, gdb throws a bit of a
fit; let’s try with a size of 0 to start:
$ ls -lah /usr/lib/debug/.build-id/e5/9f81f6573dadd5d95a6e4474d9388ab2777e2a.debug
-r--r--r-- 1 root root 0 Dec 31 1969 /usr/lib/debug/.build-id/e5/9f81f6573dadd5d95a6e4474d9388ab2777e2a.debug
$ gdb -q /usr/sbin/netlabelctl
Reading symbols from /usr/sbin/netlabelctl...
Reading symbols from /usr/lib/debug/.build-id/e5/9f81f6573dadd5d95a6e4474d9388ab2777e2a.debug...
warning: Discarding section .note.gnu.build-id which has a section size (24) larger than the file size [in module /usr/lib/debug/.build-id/e5/9f81f6573dadd5d95a6e4474d9388ab2777e2a.debug]
[...]
This obviously won’t work since gdb will throw away all our hard work because
of stat’s output, and neither will loading the real size of the underlying
file. That only leaves us with hardcoding a file size and hope nothing else
breaks significantly as a result. Let’s try it again:
$ ls -lah /usr/lib/debug/.build-id/e5/9f81f6573dadd5d95a6e4474d9388ab2777e2a.debug
-r--r--r-- 1 root root 954M Dec 31 1969 /usr/lib/debug/.build-id/e5/9f81f6573dadd5d95a6e4474d9388ab2777e2a.debug
$ gdb -q /usr/sbin/netlabelctl
Reading symbols from /usr/sbin/netlabelctl...
Reading symbols from /usr/lib/debug/.build-id/e5/9f81f6573dadd5d95a6e4474d9388ab2777e2a.debug...
(gdb)
Much better. I mean, terrible but better. Better for now, anyway.
Kilroy was here
Do I think this is a particularly good idea? I mean; kinda. I’m probably going
to make some fun 9parigato-based filesystems for use around my LAN, but I
don’t think I’ll be moving to use debugfs until I can figure out how to
ensure the connection is more resilient to changing networks, server restarts
and fixes on i/o performance. I think it was a useful exercise and is a pretty
great hack, but I don’t think this’ll be shipping anywhere anytime soon.
Along with me publishing this post, I’ve pushed up all my repos; so you
should be able to play along at home! There’s a lot more work to be done
on arigato; but it does handshake and successfully export a working
9P2000.u filesystem. Check it out on on my github at
arigato,
debugfs
and also on crates.io
and docs.rs.
At least I can say I was here and I got it working after all these years.
It has been a very busy couple of weeks as we worked against some major transitions and a security fix that required a rebuild of the $world. I am happy to report that against all odds we have a beta release! You can read all about it here: https://kubuntu.org/news/kubuntu-24-04-beta-released/ Post beta freeze I have already begun pushing our fixes for known issues today. A big one being our new branding! Very exciting times in the Kubuntu world.
In the snap world I will be using my free time to start knocking out KDE applications ( not covered by the project ). I have also recruited some help, so you should start seeing these pop up in the edge channel very soon!
Now that we are nearing the release of Noble Numbat, my contract is coming to an end with Kubuntu. If you would like to see Plasma 6 in the next release and in a PPA for Noble, please consider donating to extend my contract at https://kubuntu.org/donate !
The Ubuntu Studio team is pleased to announce the beta release of Ubuntu Studio 24.04 LTS, codenamed “Noble Numbat”.
While this beta is reasonably free of any showstopper installer bugs, you will find some bugs within. This image is, however, mostly representative of what you will find when Ubuntu Studio 24.04 is released on April 25, 2024.
Special Notes
The Ubuntu Studio 24.04 LTS disk image (ISO) exceeds 4 GB and cannot be downloaded to some file systems such as FAT32 and may not be readable when burned to a DVD. For this reason, we recommend downloading to a compatible file system. When creating a boot medium, we recommend creating a bootable USB stick with the ISO image or burning to a Dual-Layer DVD.
Full updated information, including Upgrade Instructions, are available in the Release Notes.
Please note that upgrading before the release of 24.04.1,due August 2024, is unsupported.
New Features This Release
PipeWire continues to improve with every release and is so robust it can be used for professional and prosumer use. Version 1.0.4
Ubuntu Studio Installer‘s included Ubuntu Studio Audio Configurationutility for fine-tuning the PipeWire setup or changing the configuration altogether now includes the ability to create or remove a dummy audio device. Version 1.9
Major Package Upgrades
Ardour version 8.4.0
Qtractor version 0.9.39
OBS Studio version 30.0.2
Audacity version 3.4.2
digiKam version 8.2.0
Kdenlive version 23.08.5
Krita version 5.2.2
There are many other improvements, too numerous to list here. We encourage you to look around the freely-downloadable ISO image.
Known Issues
Ubuntu Studio’s classic PulseAudio-JACK configuration cannot be used on Ubuntu Desktop (GNOME) due to a known issue with the ubuntu-desktop metapackage. (LP: #2033440)
We now discourage the use of the aforementioned classic PulseAudio-JACK configuration as PulseAudio is becoming deprecated with time in favor of PipeWire. PipeWire’s JACK configuration can be disabled to use JACK2 via QJackCTL for advanced users.
Due to the Ubuntu repositories being in-flux following the time_t transition and xz-utils security issue resolution, some items in the repository are uninstallable or causing other packaging conflicts. The Ubuntu Release Team is working around the clock to help resolve these issues, so patience is required.
Additionally, we need financial contributions. Our project lead, Erich Eickmeyer, is working long hours on this project and trying to generate a part-time income. See this post as to the reasons why and go here to see how you can contribute financially (options are also in the sidebar).
Frequently Asked Questions
Q: Does Ubuntu Studio contain snaps? A: Yes. Mozilla’s distribution agreement with Canonical changed, and Ubuntu was forced to no longer distribute Firefox in a native .deb package. We have found that, after numerous improvements, Firefox now performs just as well as the native .deb package did.
Thunderbird has become a snap this cycle in order for the maintainers to get security patches delivered faster.
Additionally, Freeshow is an Electron-based application. Electron-based applications cannot be packaged in the Ubuntu repositories in that they cannot be packaged in a traditional Debian source package. While such apps do have a build system to create a .deb binary package, it circumvents the source package build system in Launchpad, which is required when packaging for Ubuntu. However, Electron apps also have a facility for creating snaps, which can be uploaded and included. Therefore, for Freeshow to be included in Ubuntu Studio, it had to be packaged as a snap.
Q: If I install this Beta release, will I have to reinstall when the final release comes out? A: No. If you keep it updated, your installation will automatically become the final release. However, if Audacity returns to the Ubuntu repositories before final release, then you might end-up with a double-installation of Audacity. Removal instructions of one or the other will be made available in a future post.
Q: Will you make an ISO with {my favorite desktop environment}? A: To do so would require creating an entirely new flavor of Ubuntu, which would require going through the Official Ubuntu Flavor application process. Since we’re completely volunteer-run, we don’t have the time or resources to do this. Instead, we recommend you download the official flavor for the desktop environment of your choice and use Ubuntu Studio Installer to get Ubuntu Studio – which does *not* convert that flavor to Ubuntu Studio but adds its benefits.
Q: What if I don’t want all these packages installed on my machine? A: Simply use the Ubuntu Studio Installer to remove the features of Ubuntu Studio you don’t want or need!
We are happy to announce the Beta release for Lubuntu Noble (what will become 24.04 LTS)! What makes this cycle unique? Lubuntu is a lightweight flavor of Ubuntu, based on LXQt and built for you. As an official flavor, we benefit from Canonical’s infrastructure and assistance, in addition to the support and enthusiasm from the […]
New “netplan status –diff” subcommand, finding differences between configuration and system state
As the maintainer and lead developer for Netplan, I’m proud to announce the general availability of Netplan v1.0 after more than 7 years of development efforts. Over the years, we’ve so far had about 80 individual contributors from around the globe. This includes many contributions from our Netplan core-team at Canonical, but also from other big corporations such as Microsoft or Deutsche Telekom. Those contributions, along with the many we receive from our community of individual contributors, solidify Netplan as a healthy and trusted open source project. In an effort to make Netplan even more dependable, we started shipping upstream patch releases, such as 0.106.1 and 0.107.1, which make it easier to integrate fixes into our users’ custom workflows.
With the release of version 1.0 we primarily focused on stability. However, being a major version upgrade, it allowed us to drop some long-standing legacy code from the libnetplan1 library. Removing this technical debt increases the maintainability of Netplan’s codebase going forward. The upcoming Ubuntu 24.04 LTS and Debian 13 releases will ship Netplan v1.0 to millions of users worldwide.
Highlights of version 1.0
In addition to stability and maintainability improvements, it’s worth looking at some of the new features that were included in the latest release:
Simultaneous WPA2 & WPA3 support.
Introduction of a stable libnetplan1 API.
Mellanox VF-LAG support for high performance SR-IOV networking.
New hairpin and port-mac-learning settings, useful for VXLAN tunnels with FRRouting.
New netplan status –diff subcommand, finding differences between configuration and system state.
Besides those highlights of the v1.0 release, I’d also like to shed some light on new functionality that was integrated within the past two years for those upgrading from the previous Ubuntu 22.04 LTS which used Netplan v0.104:
We added support for the management of new network interface types, such as veth, dummy, VXLAN, VRF or InfiniBand (IPoIB).
Wireless functionality was improved by integrating Netplan with NetworkManager on desktop systems, adding support for WPA3 and adding the notion of a regulatory-domain, to choose proper frequencies for specific regions.
To improve maintainability, we moved to Meson as Netplan’s buildsystem, added upstream CI coverage for multiple Linux distributions and integrations (such as Debian testing, NetworkManager, snapd or cloud-init), checks for ABI compatibility, and automatic memory leak detection.
We increased consistency between the supported backend renderers (systemd-networkd and NetworkManager), by matching physical network interfaces on permanent MAC address, when the match.macaddress setting is being used, and added new hardware offloading functionality for high performance networking, such as Single-Root IO Virtualisation virtual function link-aggregation (SR-IOV VF-LAG).
The much improved Netplan documentation, that is now hosted on “Read the Docs”, and new command line subcommands, such as netplan status, make Netplan a well vested tool for declarative network management and troubleshooting.
Integrations
Those changes pave the way to integrate Netplan in 3rd party projects, such as system installers or cloud deployment methods. By shipping the new python3-netplan Python bindings to libnetplan, it is now easier than ever to access Netplan functionality and network validation from other projects. We are proud that the Debian Cloud Team chose Netplan to be the default network management tool in their official cloud-images for Debian Bookworm and beyond. Ubuntu’s NetworkManager package now uses Netplan as it’s default backend on Ubuntu 23.10 Desktop systems and beyond. Further integrations happened with cloud-init and the Calamares installer.
Typically you would use the incus command-line interface (CLI) client to get access to the Incus manager and perform the tasks for the full life-cycle of the virtual machines and system containers.
In this post we see how to install and setup the Incus Web UI. Just like the incus CLI tool that gets access to the REST API of the Incus manager (through a Unix socket or HTTPS), the Incus Web UI does the same over HTTPS. I assume that you have already installed and setup Incus.
The Incus Web UI package is incus-ui-canonical. We install it. By installing the package, we can enable Incus to serve the necessary Web pages (from /opt/incus/ui) so that we can connect with our browser and manage Incus itself.
debian@myincus:~$ incus config show
config: {}
debian@myincus:~$
We activate the Incus Web server, selecting the port number 8443. You are free to select another one, if you need to. We set core.https_address to :8443. This information appears in the incus config output.
debian@myincus:~$ incus config set core.https_address :8443
debian@myincus:~$ incus config show
config:
  core.https_address: :8443
debian@myincus:~$
Let’s verify that Incus is now listening to port 8443. Yes, it does. On all interfaces (because of the *).
This is HTTPS, where are the certificate and the server key (private key)?
debian@myincus:~$ sudo ls -l /var/lib/incus/server.key /var/lib/incus/server.crt
-rw-r--r-- 1 root root 753 Mar 28 18:54 /var/lib/incus/server.crt
-rw------- 1 root root 288 Mar 28 18:54 /var/lib/incus/server.key
debian@myincus:~$ sudo openssl x509 -in /var/lib/incus/server.crt -text -noout
Certificate:
    Data:
        Version: 3 (0x2)
        Serial Number:
            22:05:f1:14:f2:82:43:68:44:5e:1c:42:4c:28:5b:5c
        Signature Algorithm: ecdsa-with-SHA384
        Issuer: O = Linux Containers, CN = root@myincus
        Validity
            Not Before: Mar 28 18:54:17 2024 GMT
            Not After : Mar 26 18:54:17 2034 GMT
        Subject: O = Linux Containers, CN = root@myincus
        Subject Public Key Info:
            Public Key Algorithm: id-ecPublicKey
                Public-Key: (384 bit)
                pub:
                    04:fb:cd:b6:b2:25:55:68:a5:33:75:48:4c:b0:7a:
                    2f:e9:c0:16:af:6f:b2:36:f9:19:6e:b0:86:bf:d1:
                    9f:07:16:b1:26:8b:75:36:f2:fc:02:38:c7:fa:25:
                    39:01:6c:bb:48:a9:4f:57:0d:af:e1:0f:a3:cf:b1:
                    7c:a2:d9:46:77:e7:94:c7:00:1a:d0:5f:5f:93:d8:
                    11:39:8d:16:0e:d0:62:98:81:93:da:ec:b8:70:24:
                    f2:c4:da:91:0f:f8:8e
                ASN1 OID: secp384r1
                NIST CURVE: P-384
        X509v3 extensions:
            X509v3 Key Usage: critical
                Digital Signature, Key Encipherment
            X509v3 Extended Key Usage:
                TLS Web Server Authentication
            X509v3 Basic Constraints: critical
                CA:FALSE
            X509v3 Subject Alternative Name:
                DNS:myincus, IP Address:127.0.0.1, IP Address:0:0:0:0:0:0:0:1
    Signature Algorithm: ecdsa-with-SHA384
    Signature Value:
        30:64:02:30:15:f4:fa:7b:d6:52:79:d4:c9:27:b9:d6:6c:90:
        f7:0e:13:83:15:ac:af:cd:c5:f2:48:08:99:7f:7b:94:55:06:
        81:95:80:5f:0a:21:17:82:61:ac:5a:b6:5f:b8:49:b3:02:30:
        62:a3:92:66:da:ce:7c:01:49:7e:38:16:c6:16:b3:cb:aa:3d:
        1d:3f:63:12:93:e8:a1:0b:55:f0:80:99:d5:80:8a:a3:a6:2e:
        3d:68:90:a6:dc:55:29:0b:36:80:36:72

debian@myincus:~$
Note that this is a self-signed certificate. Chrome, Firefox and other browsers will complain; you can still accept to continue but it will show a broken padlock at the address bar. If you wish, you can replace these with proper certificates so that the padlock is intact. To do so, once you replace the server key and the server certificate with actual values, restart Incus. If, however, you are running an Incus cluster, you must use lxc cluster update-certificate instead to update them. Note that a common alternative to dealing with Incus certificates, is to use a reverse-proxy; you get the reverse-proxy to use a proper certificate and leave Incus as is.
At this point Incus is configured. We can continue with the next step where we get the client (our browser) to be authenticated to the server.
Getting the browser to authenticate to the server
Visit the URL of your Incus server with your browser. At first you will likely confronted with a message that the server certificate is not accepted (Warning: Potential Security Risk Ahead). Click to Accept and continue. Then, you are presented with the following screen that asks you to login. You are authenticated to the Incus server through user certificates. You are prompted here to do just that. Your browser will create
a user certificate to be installed into Incus (incus-ui.crt)
the same user certificate with a private key that will be setup in your browser(s) (incus-ui.pfx).
Click on Create a new certificate.
Creating a new certificate.
Now click on Generate to get your browser to generate the private key and the certificate.
You are asked whether you want to protect the certificate with a password. In our case we click on Skip because we do not want to encrypt the private key with a password. By clicking on Skip, the private key is still generated but it is not getting encrypted.
At this point the browser generated incus-ui.crt, which is the user certificate to install in Incus. In the following we added the user certificate to Incus.
debian@myincus:~$ incus config trust list
+------+------+-------------+-------------+-------------+
| NAME | TYPE | DESCRIPTION | FINGERPRINT | EXPIRY DATE |
+------+------+-------------+-------------+-------------+
debian@myincus:~$ incus config trust add-certificate incus-ui.crt
debian@myincus:~$ incus config trust list
+--------------+--------+-------------+--------------+----------------------+
|     NAME     |  TYPE  | DESCRIPTION | FINGERPRINT  |     EXPIRY DATE      |
+--------------+--------+-------------+--------------+----------------------+
| incus-ui.crt | client |             | b89b80eb4c89 | 2026/12/23 21:08 UTC |
+--------------+--------+-------------+--------------+----------------------+
debian@myincus:~$
The two files have been generated. We are adding incus-ui.crt to Incus, and incus-ui.pfx to the Web browser.
The page above has instructions on how to add the user certificate to Firefox, Chrome, Edge and macOS. For example, for the case of Firefox, type the following to the address bar and press Enter. Alternatively, go to Settings→Privacy & Security→Certificates. There, click on View Certificates… and select the Your Certificates tab. Finally, click to Import… the incus-ui.pfx certificate file.
about:preferences#privacy
This is found in Firefox under Settings→Privacy & Security→Certificates.
When you add the incus-ui.pfx user certificate in Firefox, it will appear as in the following screenshot.
The incus-ui.pfx certificate has been added to this instance of Firefox.
Subsequently, switch back to the Firefox tab with the Incus UI page and you are shown the following prompt to get your browser to send the user certificate to the Incus manager in order to get authenticated, and be able to manage Incus through the Web. Click on OK.
You are prompted to identify yourself to Incus UI in order to be able to manage the Incus installation.
Finally, you are able to manage Incus over the Web with Incus UI. The Web page loads up and you can perform all tasks that you can do with the incus command-line client.
Your browser is now authenticated through your user certificate and you can manage Incus over the Web with Incus UI.
Using the Incus UI
We click on Create Instance to create a first instance. We select from the list which image to use, then click to Create and start.
Creating an instance and starting it.
While the instance is created, you are updated with the different steps that take place. In the end, the instance is successfully launched.
The instance has been created and is running.
Conclusion
With Incus UI you are able to go through all the workflow of managing Incus instances through your Web browser. Incus UI has been implemented as a stateless Web application, which means that no information are stored on the browser. For example, the browser does not maintain a database with the created instances; the state is maintained on Incus.
There are a few more UI Web applications for Incus, including lxops. At some point in the future I expect to cover them as well.
Tips and Tricks
How to make the Incus port accessible to localhost only
The address has the format of <ip address>:<port>. You can specify localhost (127.0.0.1) for the part of the IP address. By doing so, Incus will only bind to localhost and listen to local connections only.
debian@myincus:~$ incus config show
config:
  core.https_address: :8443
debian@myincus:~$ incus config set core.https_address 127.0.0.1:8443
debian@myincus:~$ incus config show
config:
  core.https_address: 127.0.0.1:8443
debian@myincus:~$ sudo lsof -i :8443
COMMAND  PID USER   FD   TYPE DEVICE SIZE/OFF NODE NAME
incusd  8338 root    8u  IPv4  30315      0t0  TCP localhost:8443 (LISTEN)
debian@myincus:~$
What’s in incus-ui.crt and incus-ui.pfx?
You can use openssl to decode both files. This is an RSA 2048-bit certificate using the SHA-1 hash function.
$ openssl x509 -in incus-ui.crt -noout -text
Certificate:
    Data:
        Version: 3 (0x2)
        Serial Number:
            01:12:00:11:07:65:00:03:00:10:00:41:00:04:09:11
        Signature Algorithm: sha1WithRSAEncryption
        Issuer: C = AU, ST = Some-State, O = Incus UI 10.10.10.98 (Browser Generated)
        Validity
            Not Before: Mar 28 21:08:58 2024 GMT
            Not After : Dec 23 21:08:58 2026 GMT
        Subject: C = AU, ST = Some-State, O = Incus UI 10.10.10.98 (Browser Generated)
        Subject Public Key Info:
            Public Key Algorithm: rsaEncryption
                Public-Key: (2048 bit)
                Modulus:
                    00:ce:f8:1d:67:e1:a3:f5:1a:16:b6:26:63:8f:32:
                    42:99:0d:af:86:8b:18:49:1a:4b:8e:ab:68:e1:04:
                    ba:24:dd:e6:27:d5:df:7a:13:cf:16:b3:33:28:89:
                    e0:ab:c8:dc:c1:2a:0a:de:ed:26:3a:77:74:dd:42:
                    1c:e2:22:fc:a5:a5:68:c1:c9:3b:4d:12:15:27:ae:
                    c6:50:ec:dc:f1:0a:ba:00:0c:83:d0:0d:0f:81:90:
                    4e:30:43:cb:45:bf:e2:e9:17:39:40:3b:95:8b:8b:
                    18:e9:59:51:fc:9a:7a:80:e4:73:b3:54:bd:ff:1c:
                    7c:81:75:16:e3:6f:3a:56:9b:0f:a3:73:55:45:03:
                    d8:fb:f3:34:4c:60:4f:f2:67:9f:66:ea:29:29:78:
                    6c:66:05:d6:7d:96:cd:0f:2b:4b:9c:71:2c:09:6f:
                    e2:b4:23:d0:5d:d0:fe:b0:6a:b1:58:5e:d7:b5:47:
                    9e:aa:47:34:f8:7d:e1:ed:fe:bf:97:3d:99:49:42:
                    af:e2:e5:b3:c5:1e:58:b1:98:01:db:8f:25:9f:f8:
                    d9:03:02:06:f9:99:0a:3a:a1:70:9d:fe:64:0d:c2:
                    d8:cc:f0:1c:53:e4:31:4c:78:12:c2:fd:72:23:6a:
                    f4:7e:41:f9:d5:df:6b:ad:2c:52:29:d0:7f:eb:65:
                    64:0f
                Exponent: 65537 (0x10001)
    Signature Algorithm: sha1WithRSAEncryption
    Signature Value:
        28:b3:5c:48:64:8c:23:82:dd:e2:05:6a:9d:18:dd:43:f4:07:
        e6:be:1e:80:b7:f9:0c:0f:3d:cd:b8:bd:7b:55:7e:36:6d:74:
        24:d5:69:b2:24:51:3a:2d:c5:95:68:b5:dc:27:d5:83:d9:bc:
        cb:d0:fd:55:24:63:7d:c6:65:9b:f1:b3:9d:f7:b4:4e:ba:83:
        eb:bf:f5:d0:f6:95:2d:7b:90:4e:d3:89:ac:f0:87:e6:fa:9d:
        f6:ea:c2:42:f2:15:17:74:5c:e4:3c:ed:1a:42:3c:e7:04:aa:
        65:42:3e:75:5c:24:8e:52:85:0d:4b:b2:e2:ec:fa:57:4a:68:
        35:4b:8f:3c:13:fc:15:09:80:5a:b1:c8:e0:22:f5:69:25:4b:
        46:8b:e0:b9:e1:3a:f5:0c:40:d2:c3:75:9c:79:9a:aa:68:9b:
        21:36:ed:67:cb:6d:fc:bc:f0:0b:5a:2b:1a:4c:73:67:c5:79:
        b6:27:b9:58:d0:c7:ea:84:21:bf:f4:7c:44:11:d7:88:ab:1d:
        e4:53:c9:10:cd:e6:b8:5a:7a:92:73:a8:1e:fe:1c:2e:dc:e8:
        7e:3d:e9:a2:6d:26:5a:09:40:a1:3e:51:40:8b:da:57:37:9a:
        8d:0e:d8:cf:c1:0a:b1:0b:95:53:05:41:29:39:af:93:9b:aa:
        10:af:a1:6c
$
For the incus-ui.pfx file, we first convert to the PEM format, then print the contents. The PFX file contains the certificate (the same that was added earlier to Incus) along with the private key.
You tried to access the IP address of the Incus server as (for example) https://192.168.1.10/ while you should have specified the IP address as well. The URL should look like https://192.168.1.10:8443/.
Error: Client sent an HTTP request to an HTTPS server
You tried to connect to the Incus server at an address (for example) http://192.168.1.10:8443/ but you omitted the s in https. Use https://192.168.1.10:8443/ instead.
Warning: Potential Security Risk Ahead
You are accessing the Incus server through the HTTPS address for the first time and the certificate has not been signed by a certification authority.
First attempt to access the Incus server over HTTPS with your browser.
Click on Advanced and select to Accept the risk and Continue. If you want to avoid this error message, you need to provide a server certificate that is accepted by your browser.
As many of you know, I lost my beloved son March 9th. This has hit me really hard, but I am staying strong and holding on to all the wonderful memories I have. He grew up to be an amazing man, devoted christian and wonderful father. He was loved by everyone who knew him and will be truly missed by us all. I have had folks ask me how they can help. He left behind his 7 year old son Mason. Mason was Billy’s world and I would like to make sure Mason is taken care of. I have set up a gofundme for Mason and all proceeds will go to the future care of him.
You will see the activity in this ramp back up as the KDEneon Core project is finally a go! I will participate in the project with part time status and get everyone in the Enokia team up to speed with my snap knowledge, help prepare the qt6/kf6 transition, package plasma, and most importantly I will focus on documentation for future contributors.
I have created the ( now split ) qt6 with KDE patchset support and KDE frameworks 6 SDK and runtime snaps. I have made the kde-neon-6 extension and the PR is in: https://github.com/canonical/snapcraft/pull/4698 . Future work on the extension will include multiple versions track support and core24 support.
I have successfully created our first qt6/kf6 snap ark. They will show showing up in the store once all the required bits have been merged and published.


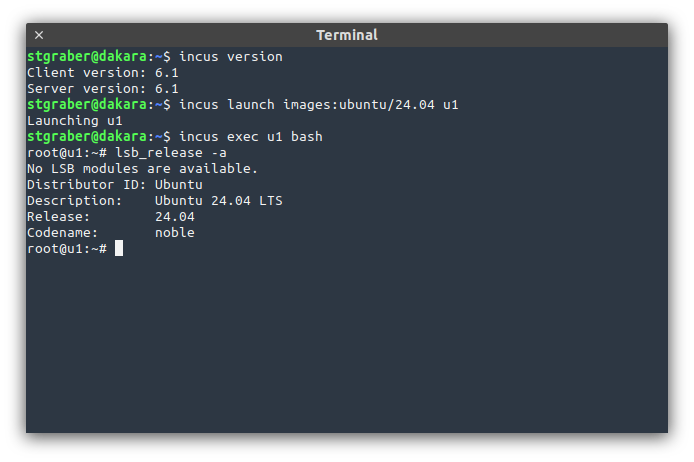


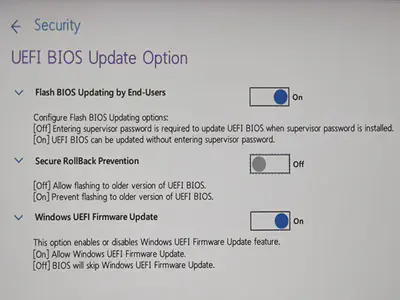
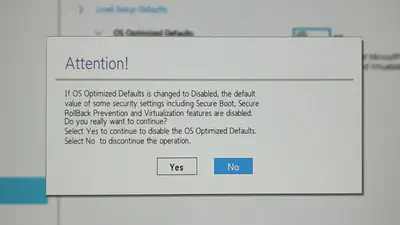


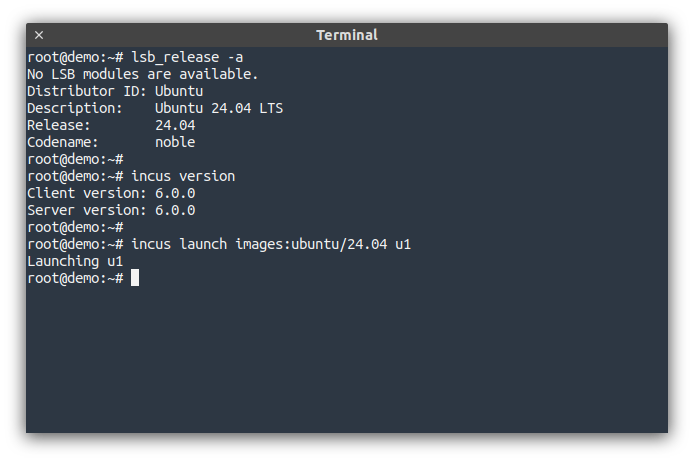
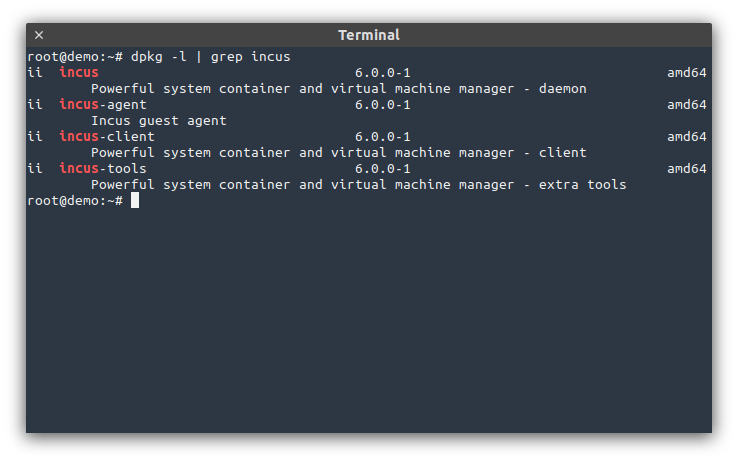
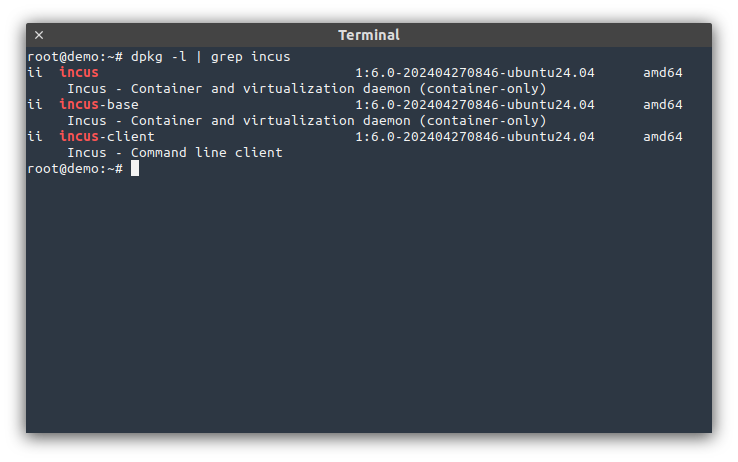

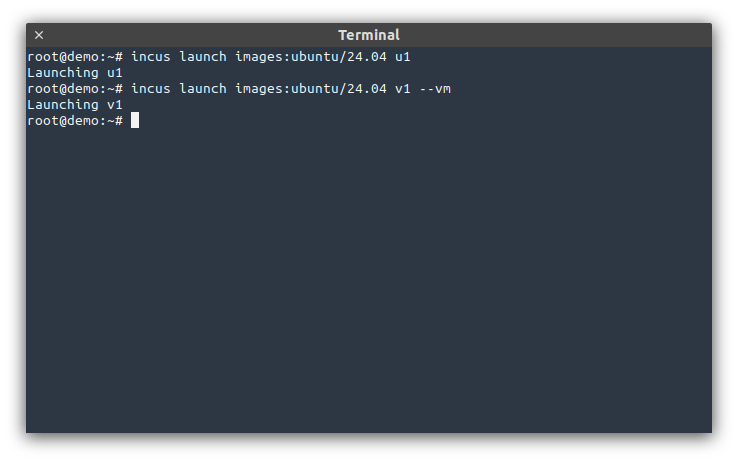
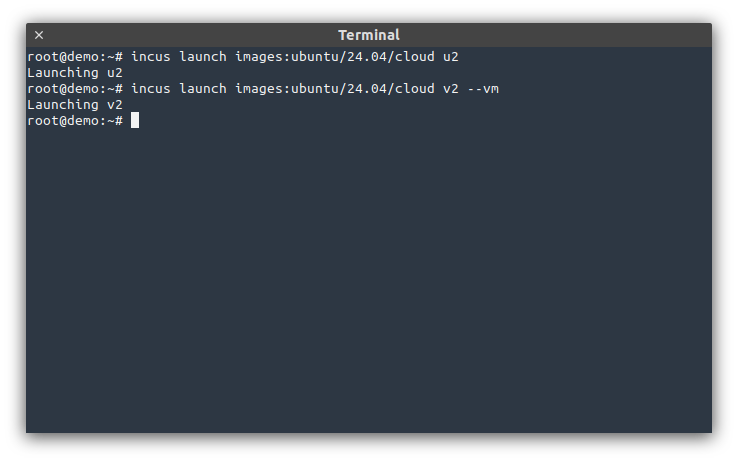
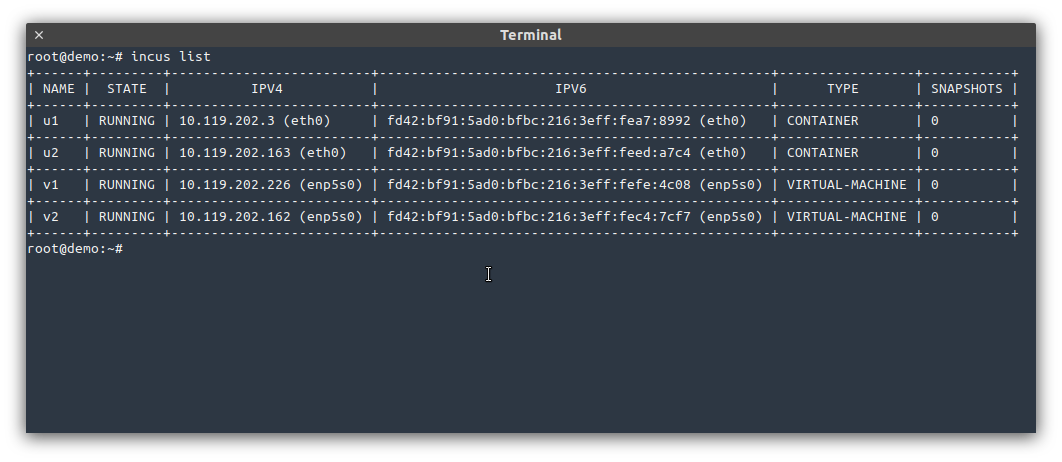


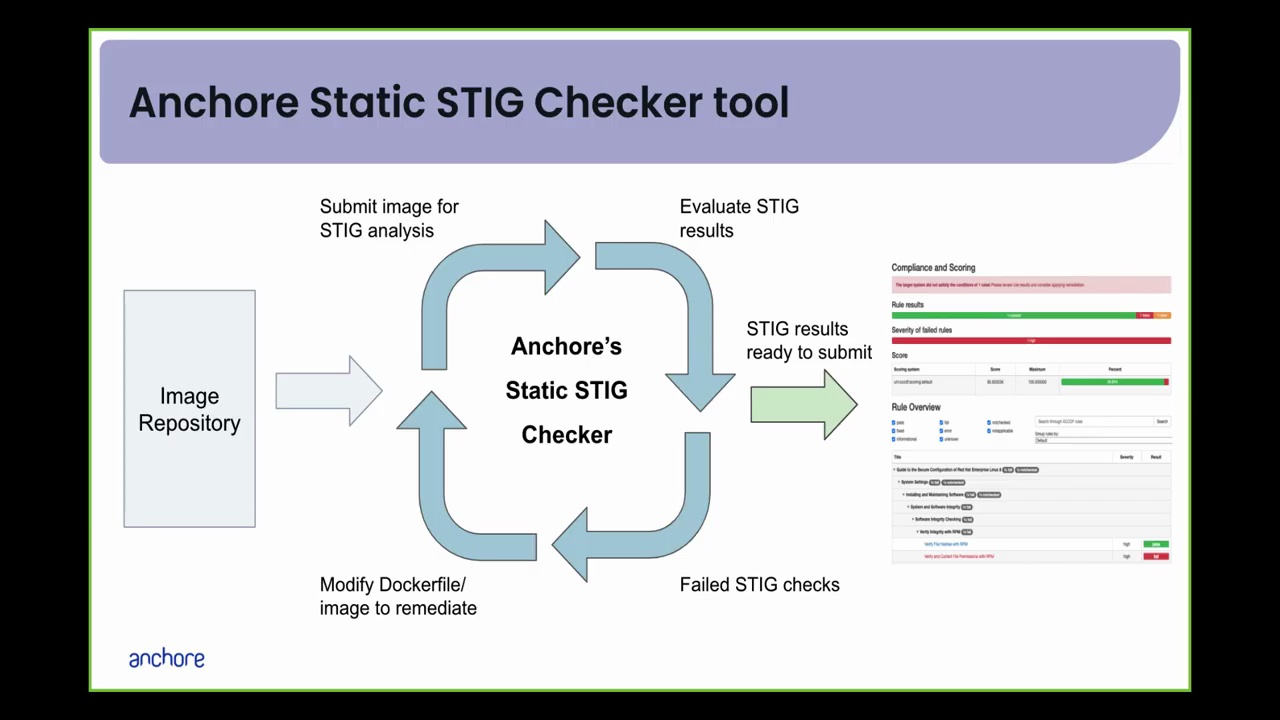
 Kubuntu 24.04 with Plasma 5.27.11


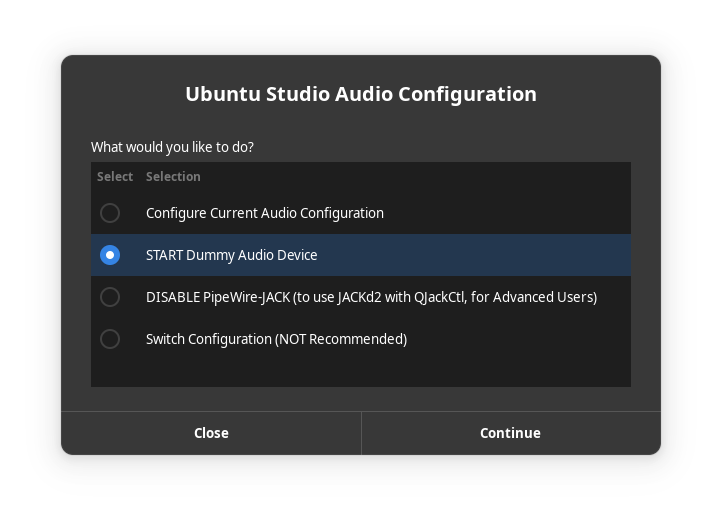


 Ubuntu MATE 24.04 LTS


 Xubuntu 24.04, featuring the latest updates from Xfce 4.18 and GNOME 46.
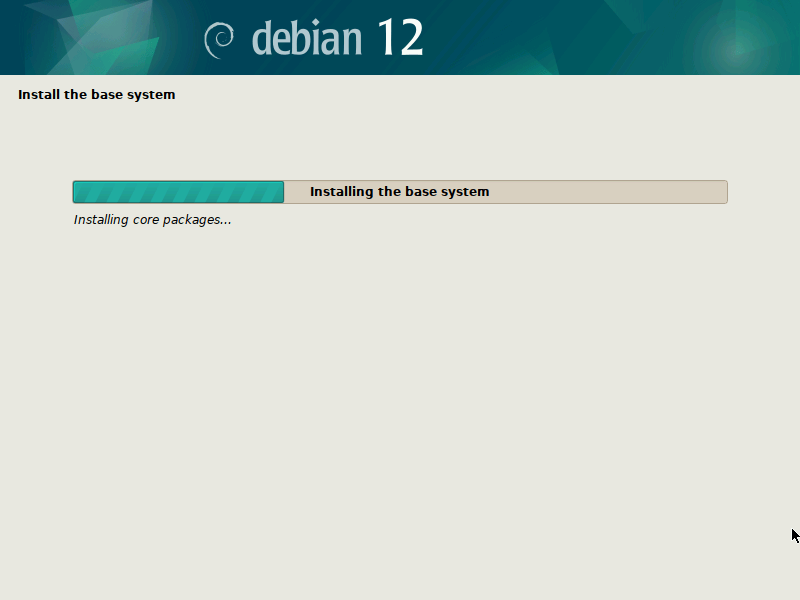
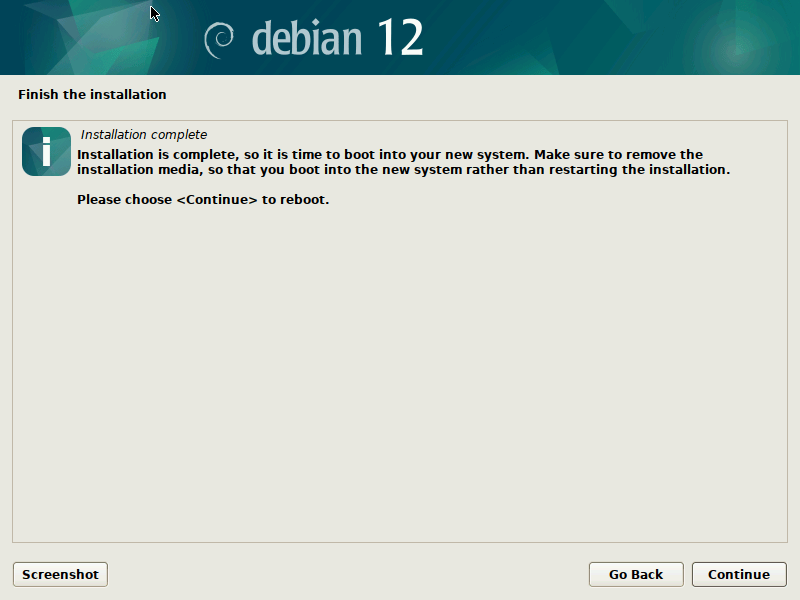
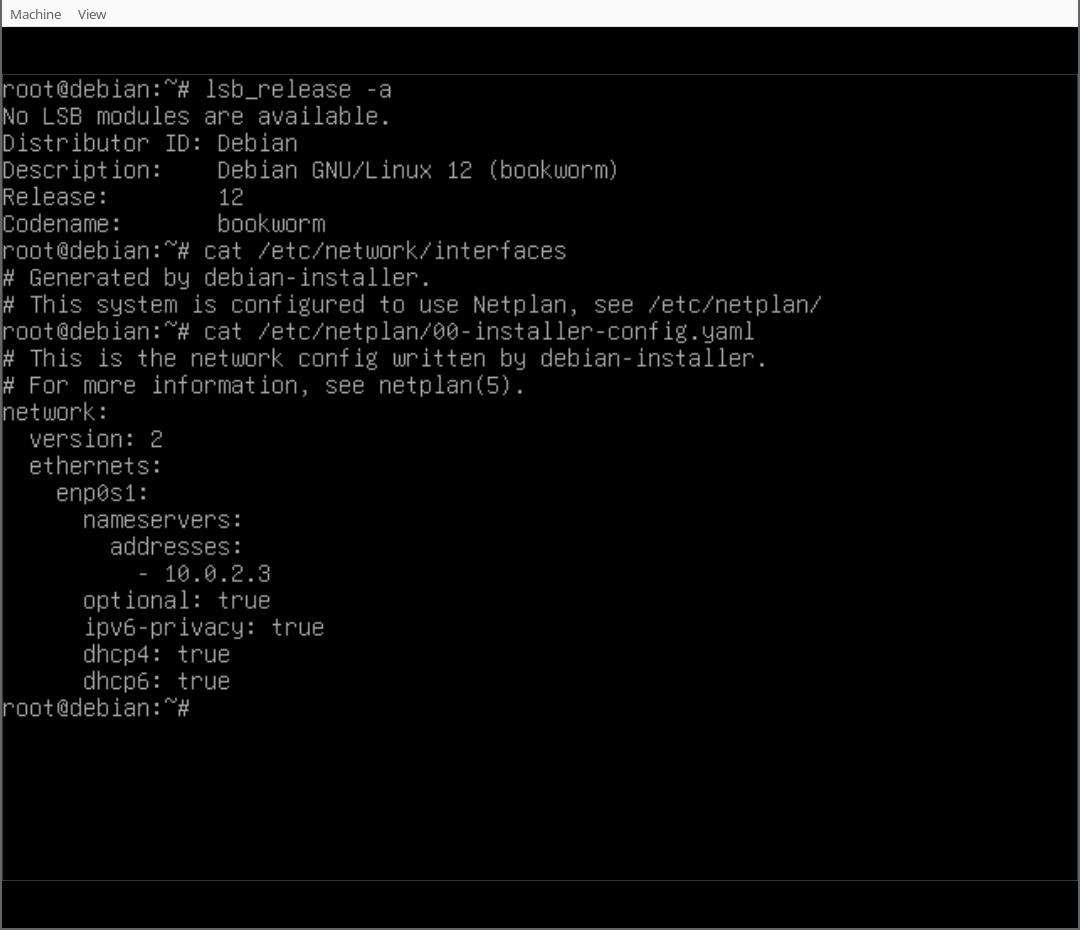
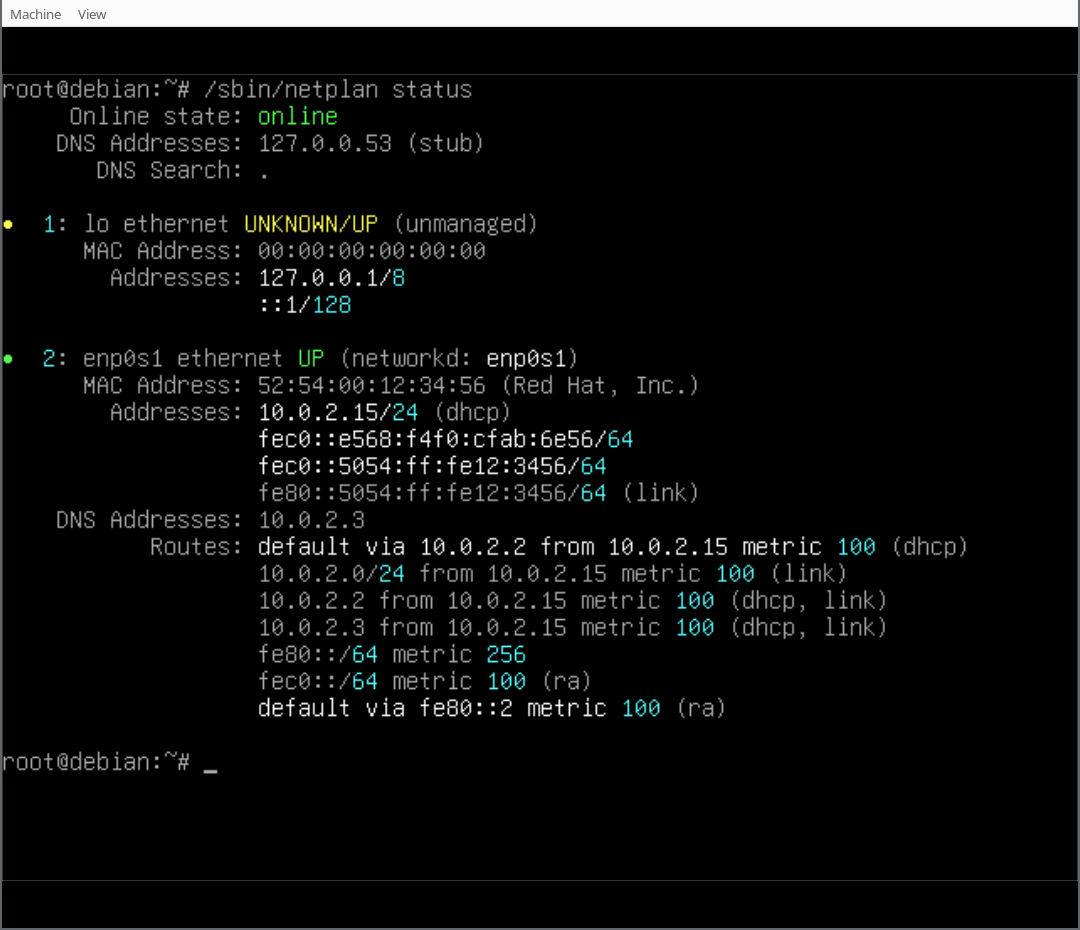
 Ubuntu MATE 23.10